NetSuite integration
How to set up and configure the NetSuite integration in Engine.
← Back to Accounting integrations
1. Confirm prerequisites and open the NetSuite integration
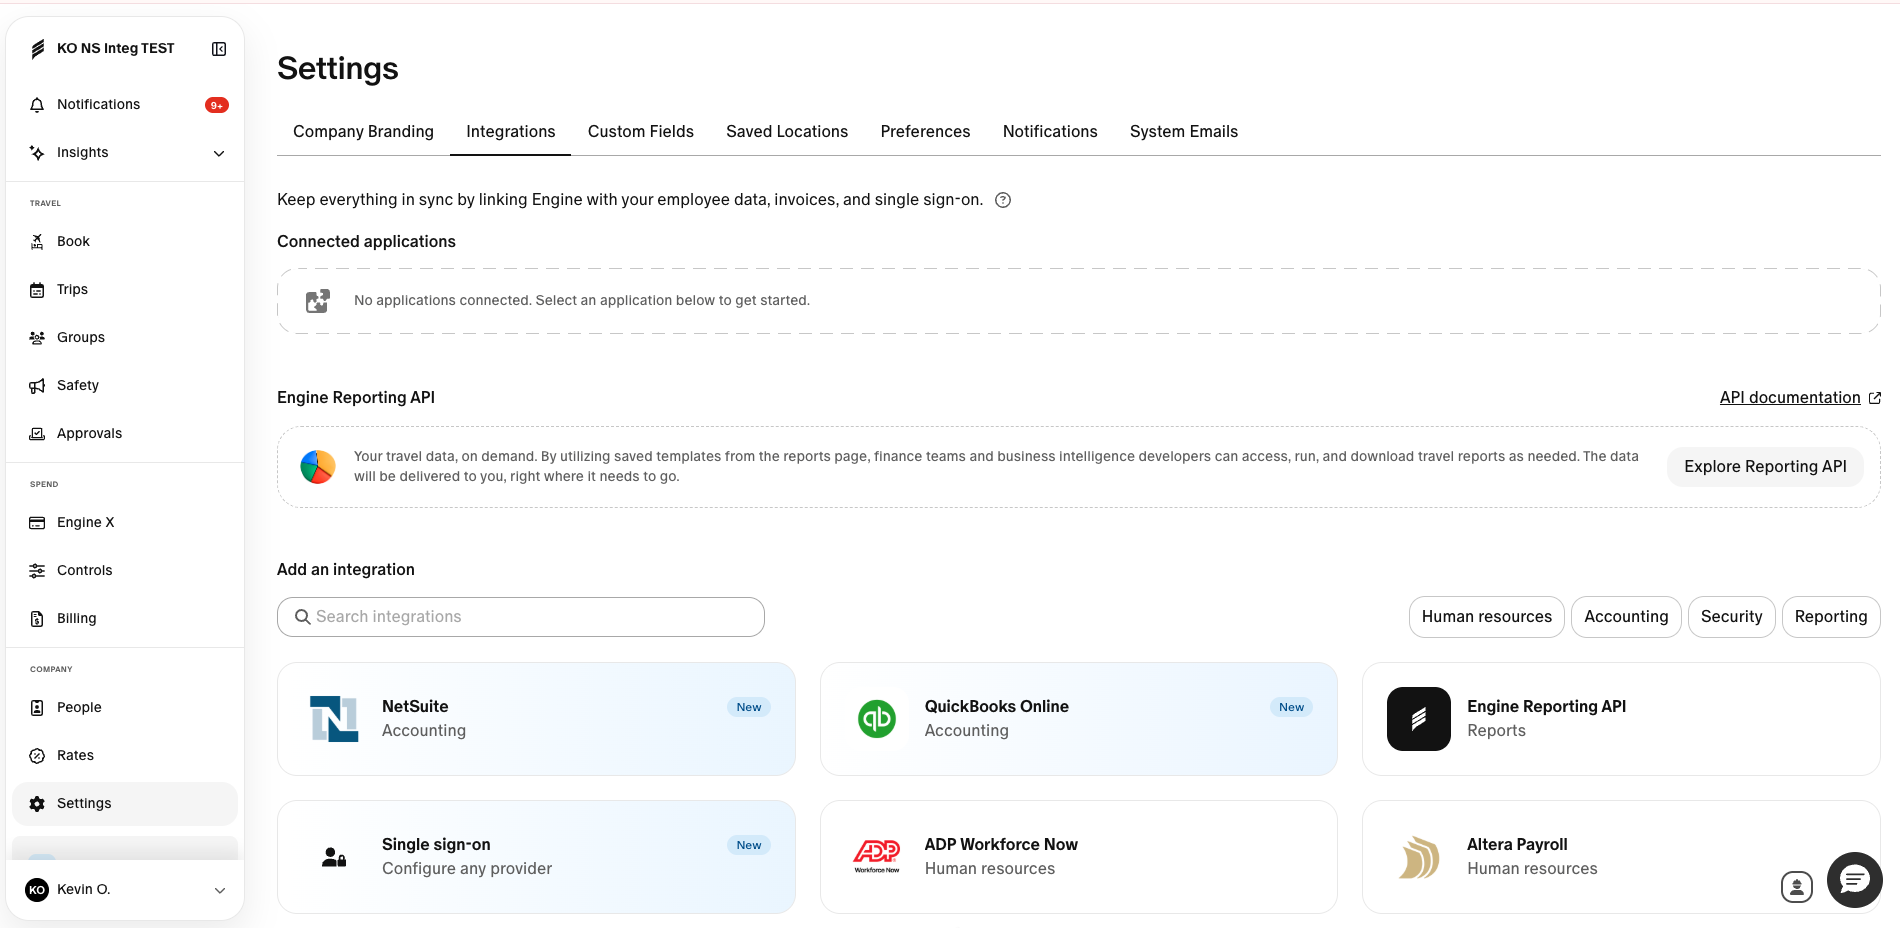
- You must be an Engine admin to access Settings > Integrations.
- NetSuite integration tiles are currently available only for Direct Billing and Engine X customers.
- In Engine, open Integrations and select NetSuite to begin.
- Review the high-level setup overview, agree to connecting the NetSuite integration, then click Get Started.
- You'll be prompted to log into NetSuite, since part of the setup must be completed there.
2. Enter the NetSuite Account ID
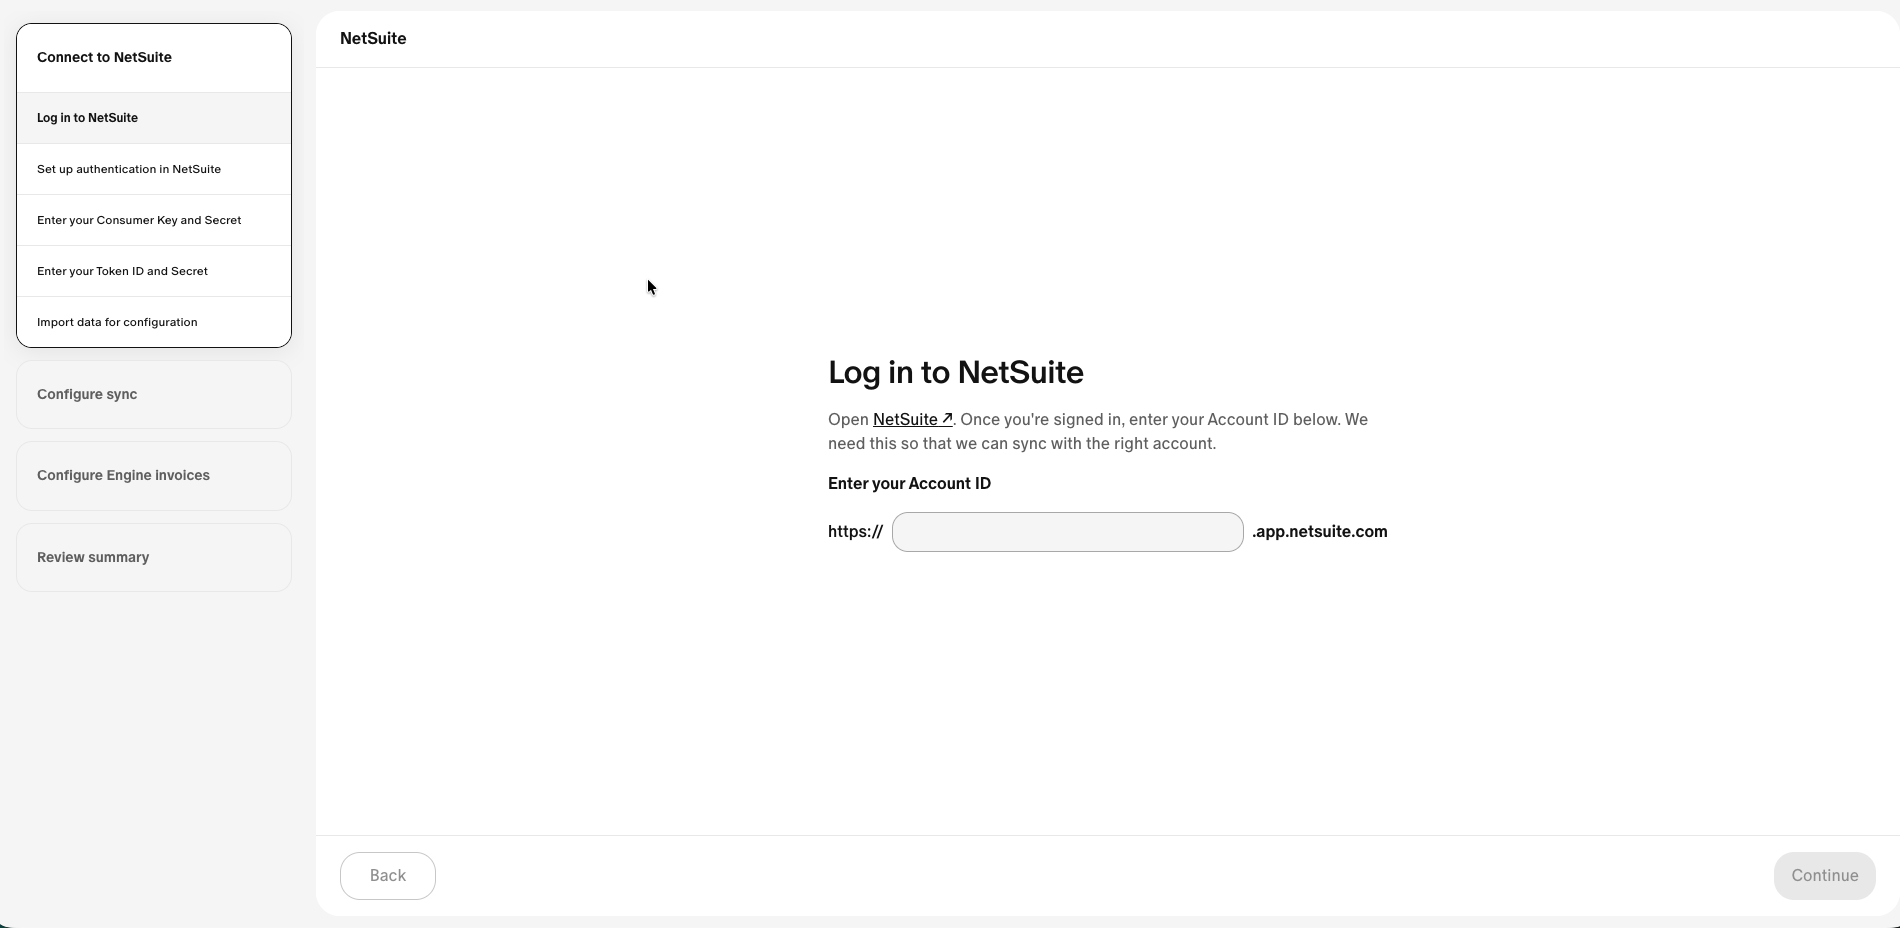
- In NetSuite, find Account ID, accessible in the account's NetSuite URL.
- Copy that account ID into Engine.
- Click Continue to move into authentication setup.
3. Enable required SuiteCloud features
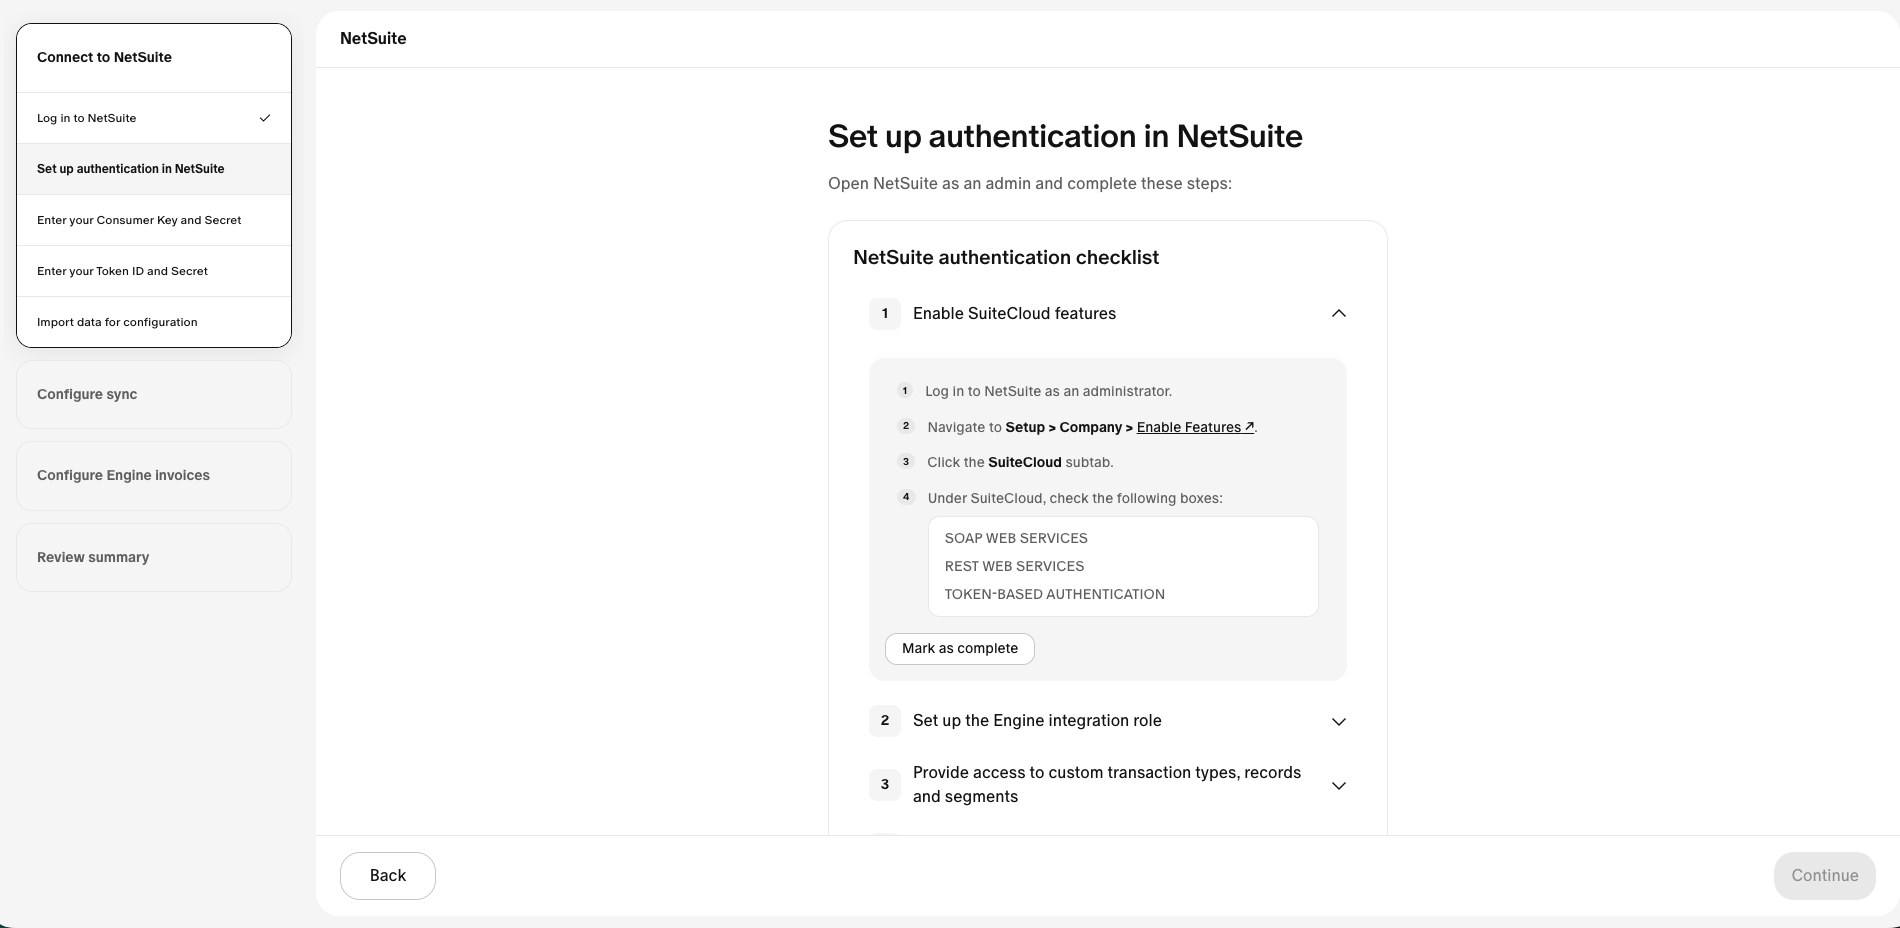
- In NetSuite, go to Setup > Company > Enable Features > SuiteCloud.
- Make sure these boxes are checked:
- SOAP Web Services
- REST Web Services
- Token-Based Authentication
- If they are not enabled, check them and save.
- Return to Engine and mark this step complete.
4. Create a dedicated NetSuite role for Engine
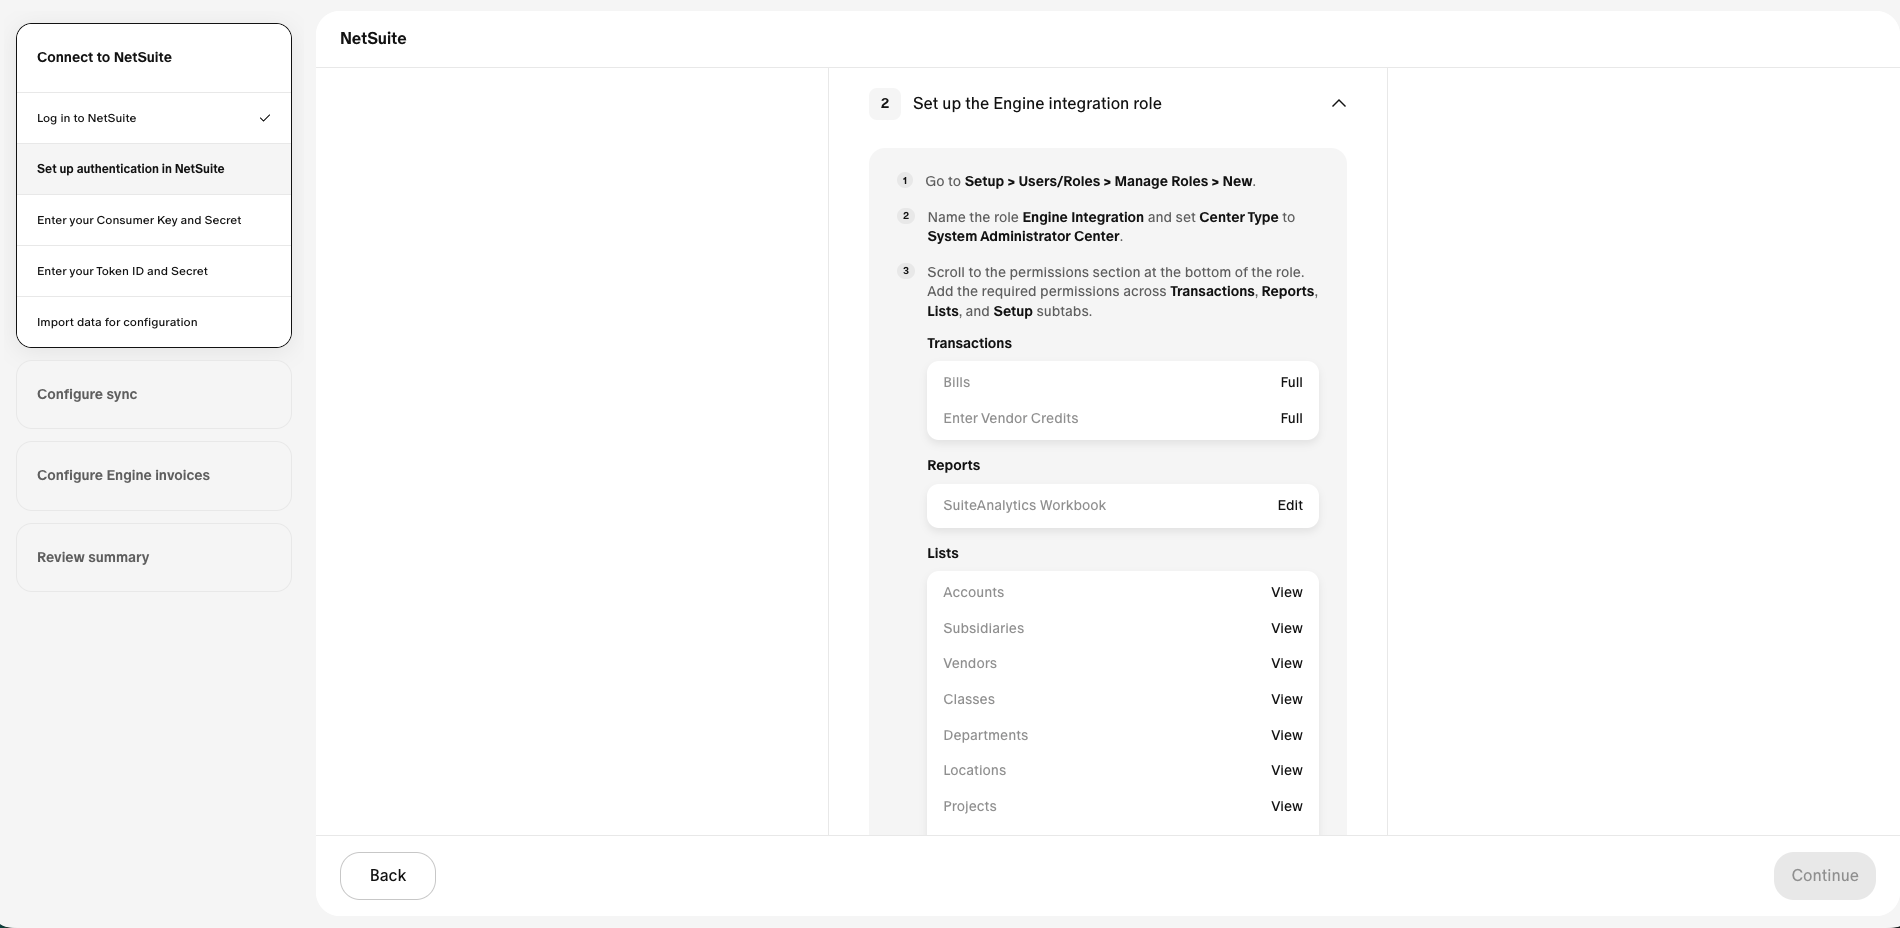
- This role gives Engine permission to read and write data with NetSuite.
- In NetSuite, go to Setup > Users/Roles > Manage Roles > New Role.
- Create a role named something like Engine Integration.
- Set the role to System Administrator Center.
- Add the required permissions under:
- Transactions
- Reports
- Lists
- Setup
- Save the role.
- Back in Engine, mark this step complete.
5. Optional: enable access for custom transaction types, records, and segments
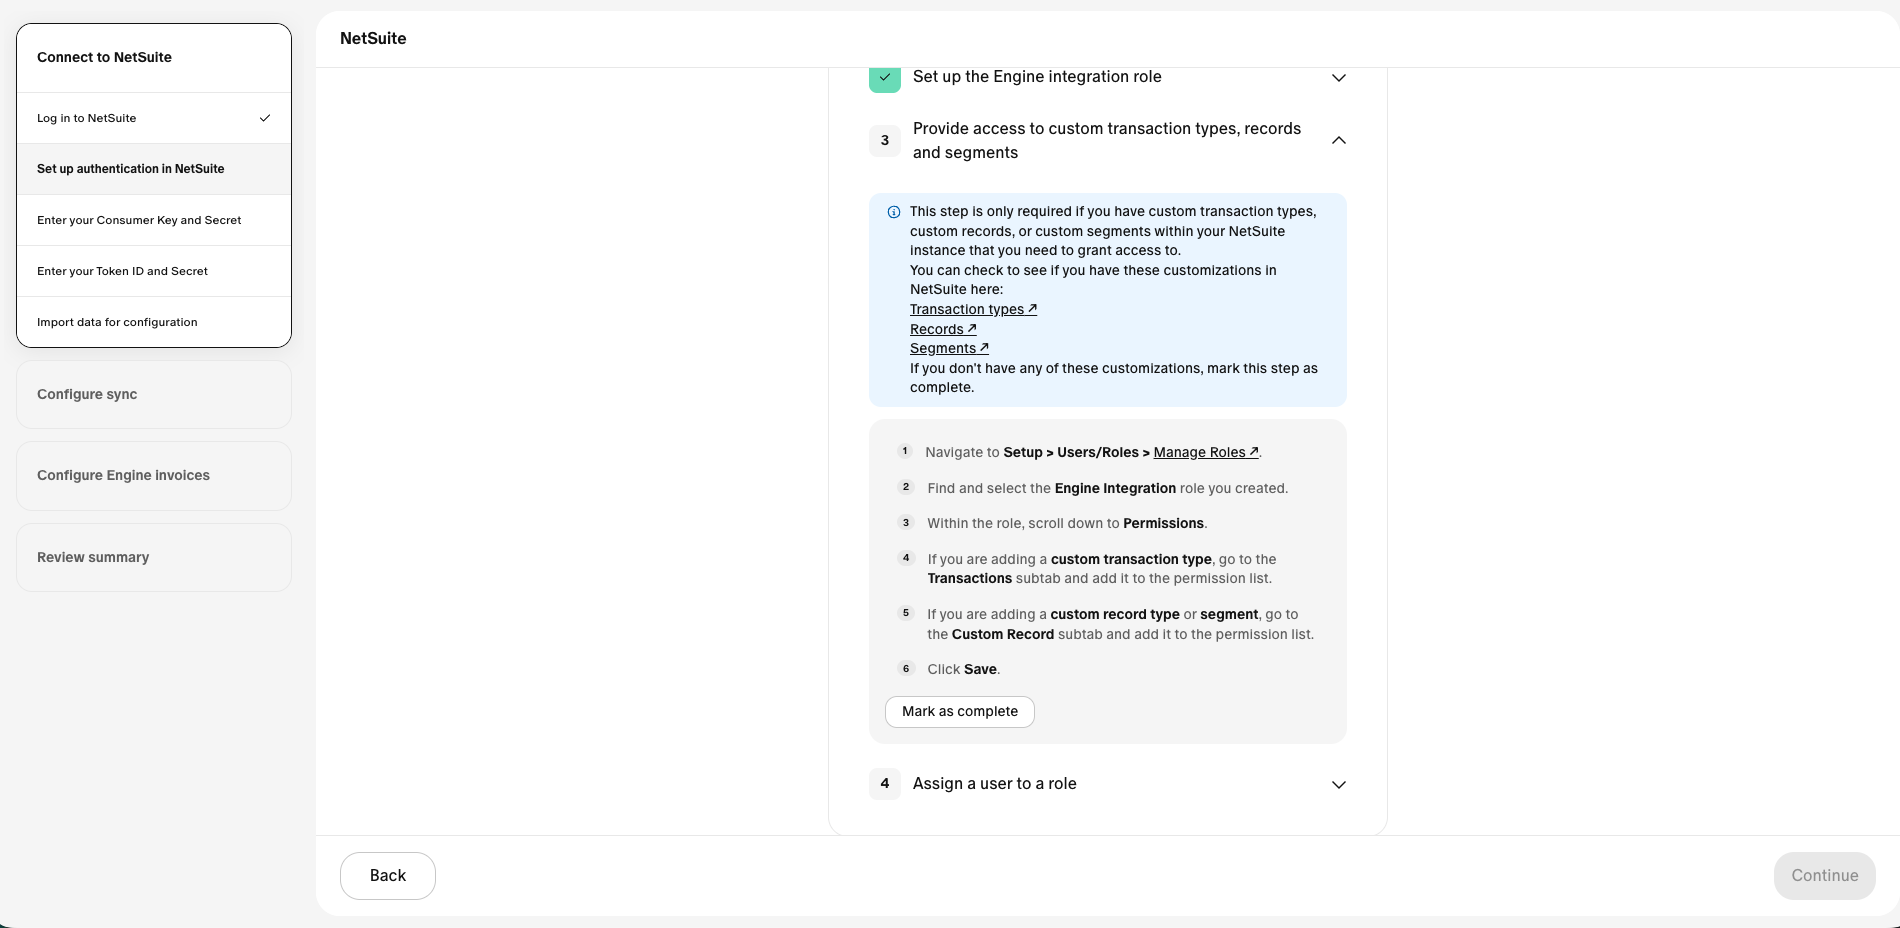
- This step is only needed if you use custom transaction types, records, or segments.
- If those customizations exist, grant Engine permission to access them.
- Mark the step complete if it does not apply.
6. Assign the new role to a NetSuite user
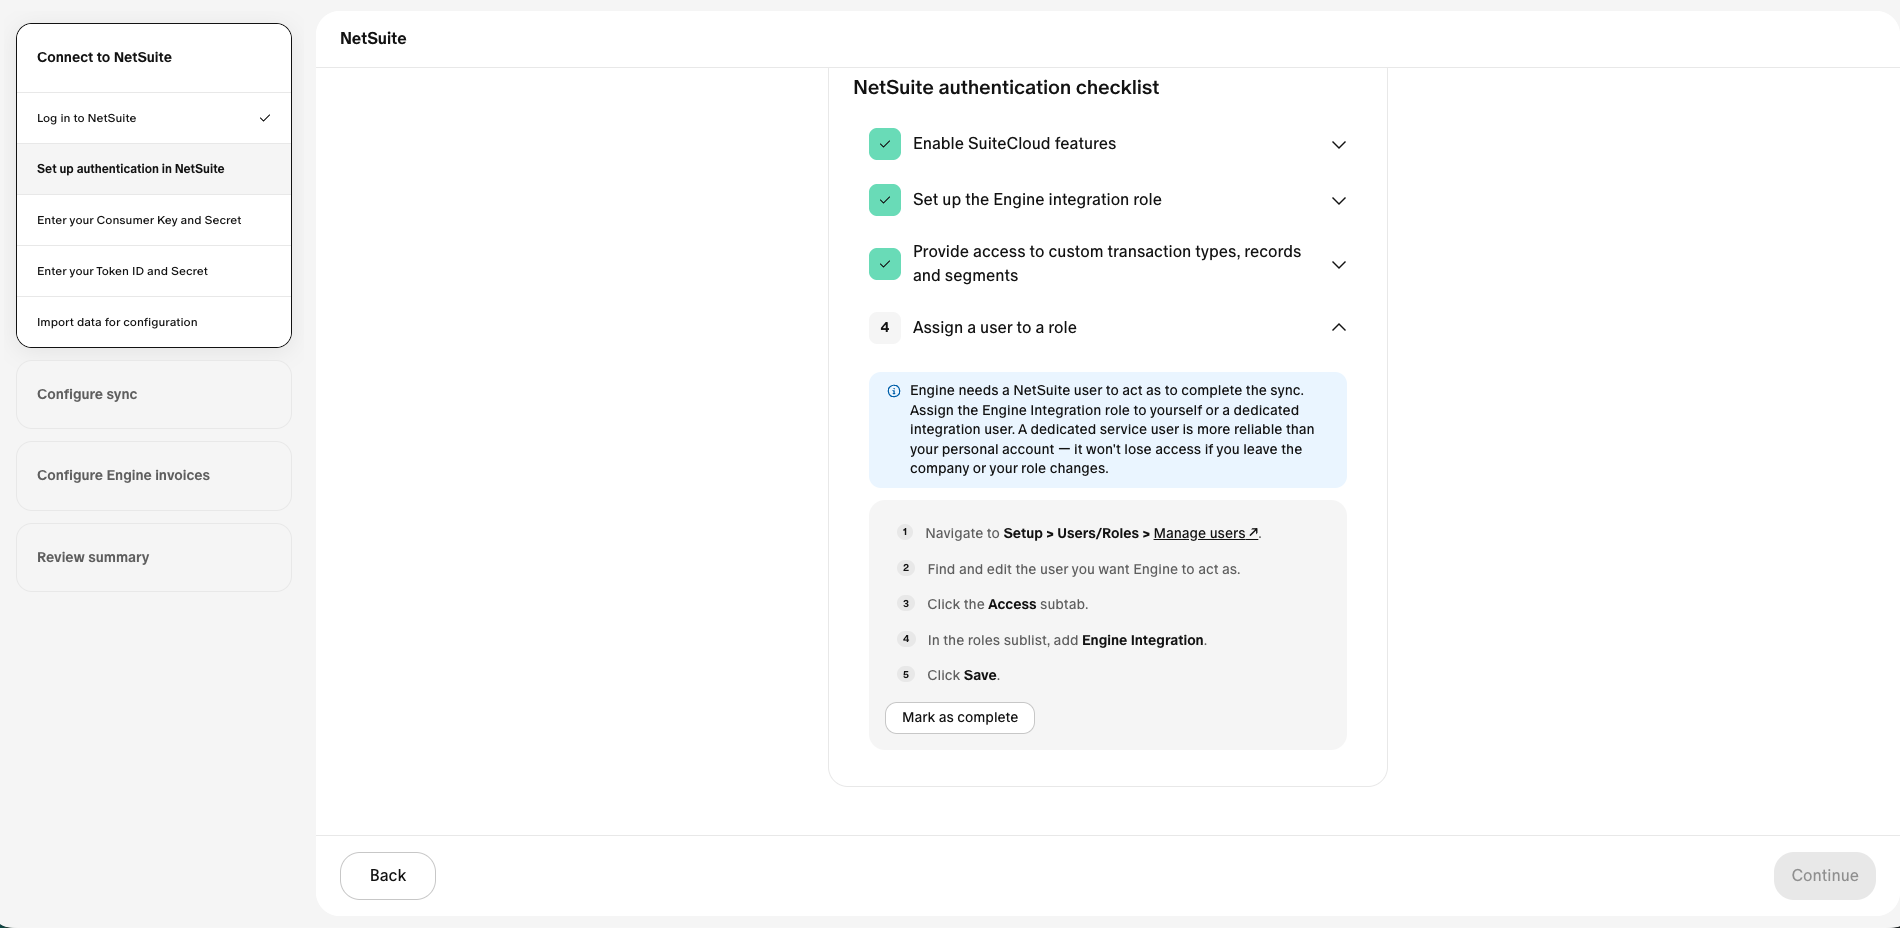
- In NetSuite, go to Setup > Users/Roles > Manage Users.
- Choose the user Engine will use to connect to NetSuite.
- Edit that user's access and add the new Engine Integration role.
- Many customers create a dedicated system user for this purpose.
- Save the user record, then mark the step complete in Engine.
7. Create the NetSuite integration record and capture the customer credentials
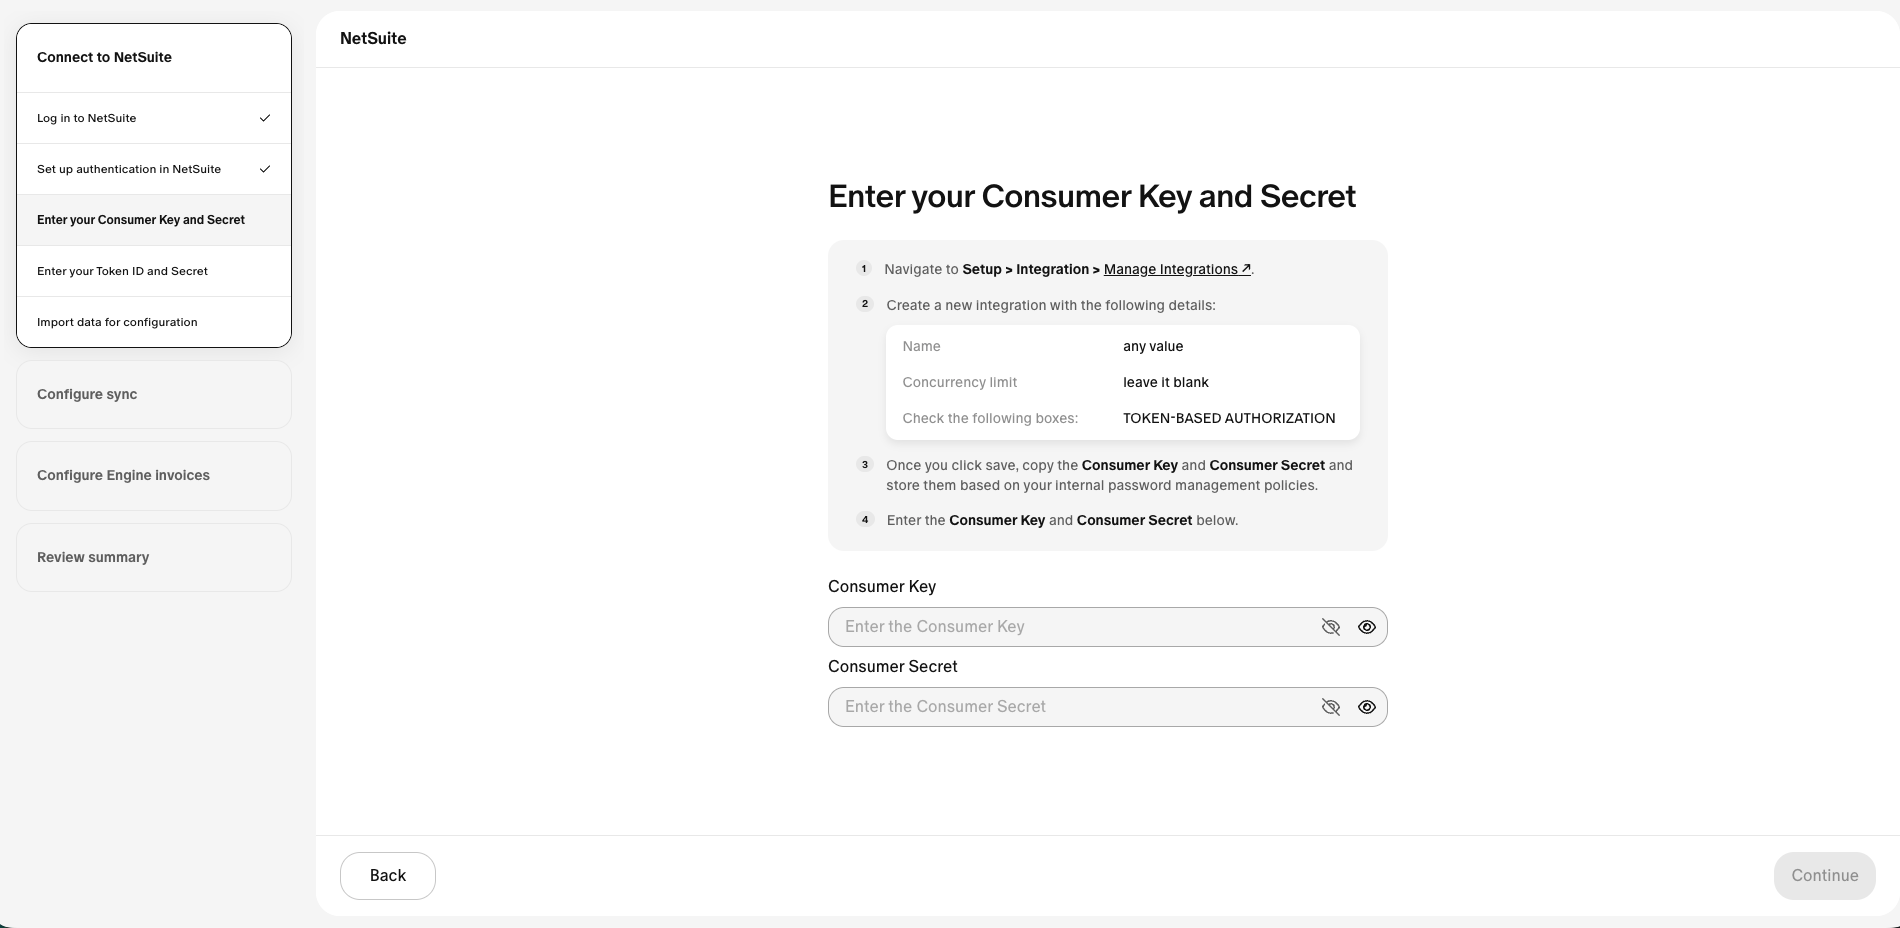
- In NetSuite, go to Setup > Integration > Manage Integrations.
- Create a new integration record with any name you want.
- Recommended settings:
- Leave Concurrency Limit blank
- Enable Token-Based Authentication
- Uncheck OAuth 2.0
- Save the integration.
- NetSuite will generate a Customer Key and Customer Secret.
- Copy those values into Engine, store based on your password retention policies, and continue.
8. Create an access token for the integration
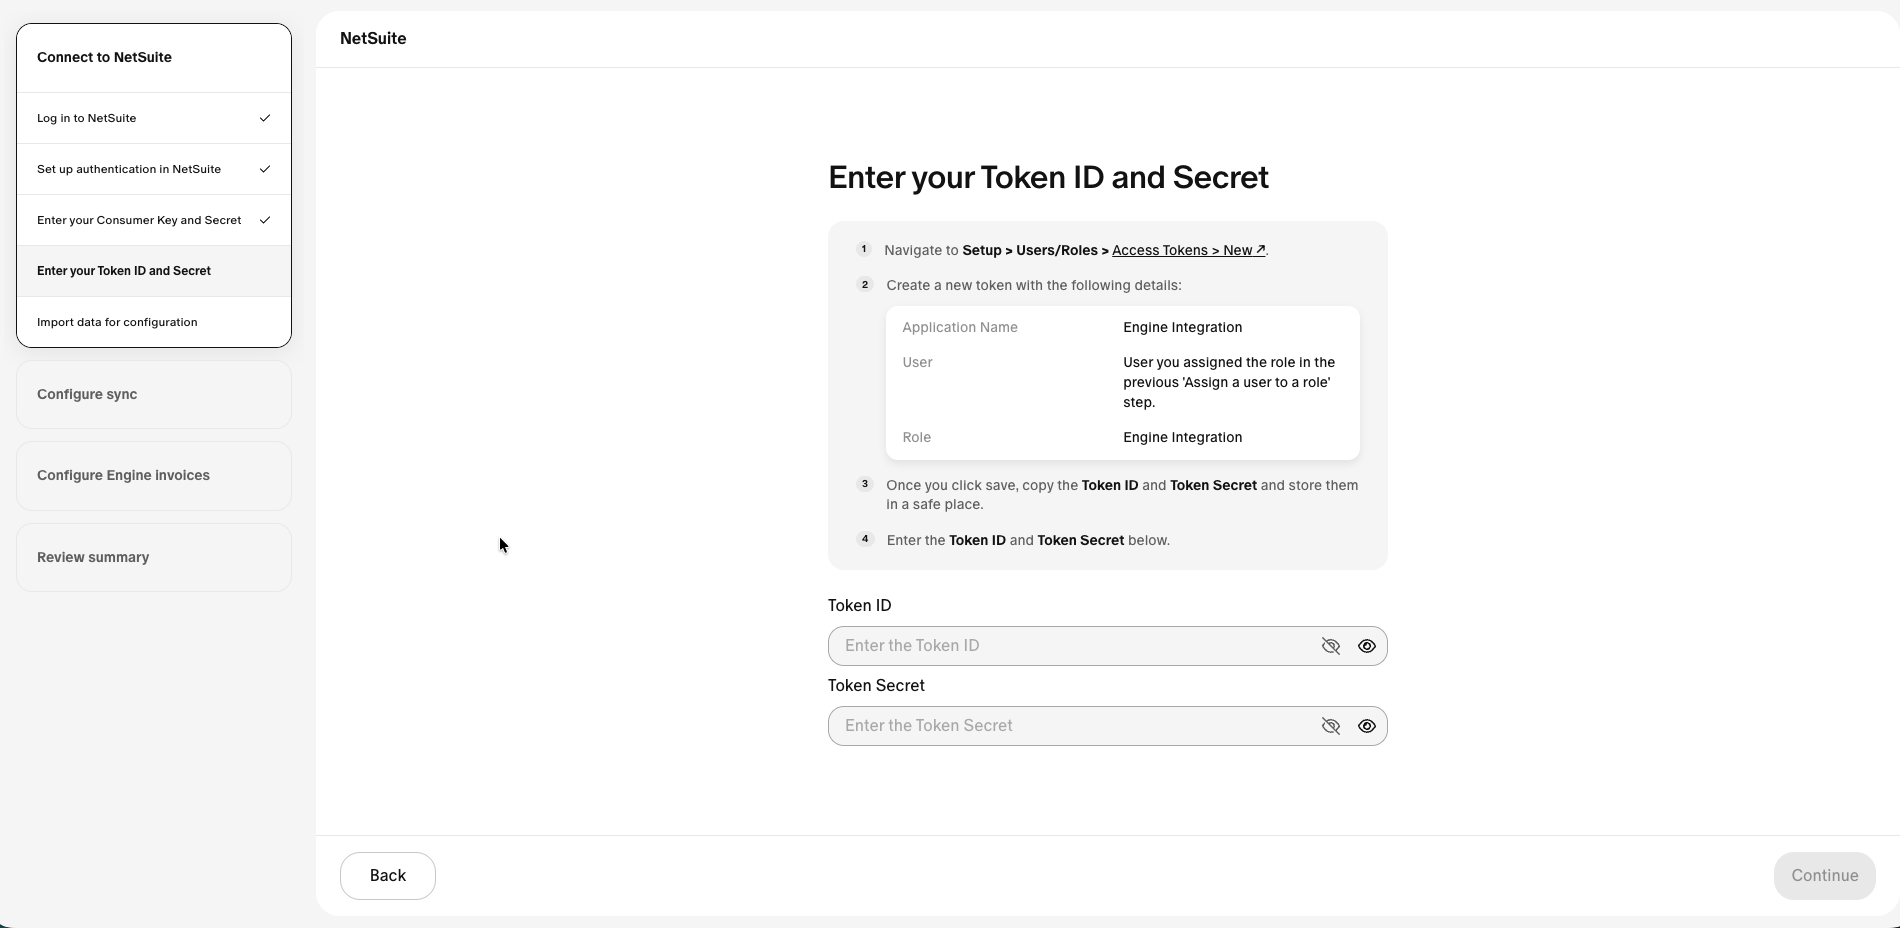
- In NetSuite, create a new access token.
- Use:
- The Application Name from the integration record
- The User assigned earlier
- The Role created for Engine
- Save the token.
- NetSuite will generate a Token ID and Token Secret.
- Copy those values into Engine, store based on your password retention policies, and continue.
9. Sync NetSuite reference data into Engine
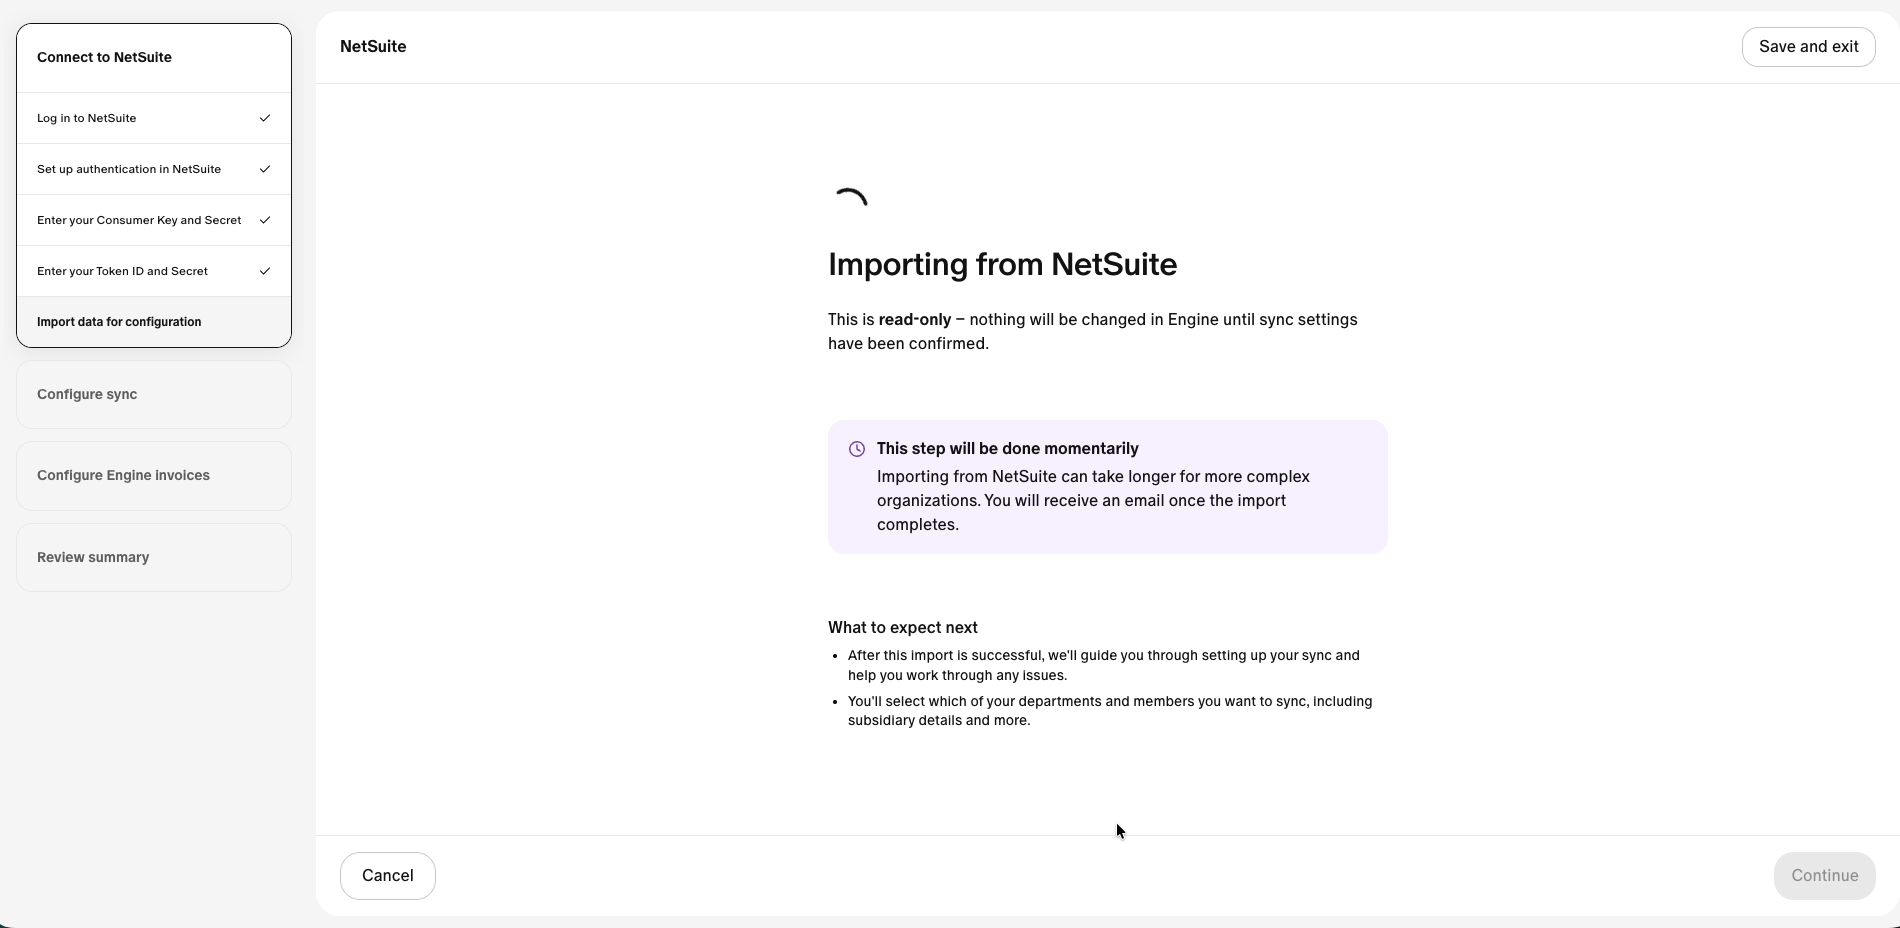
- Engine now pulls in key NetSuite data needed for mapping.
- This includes:
- Vendor list
- Custom fields
- Chart of accounts
- Segments
- This helps Engine match NetSuite values correctly during bill sync.
- Once the sync finishes, click Continue.
10. Optional: if you use multiple entities, select the relevant one for Engine billing
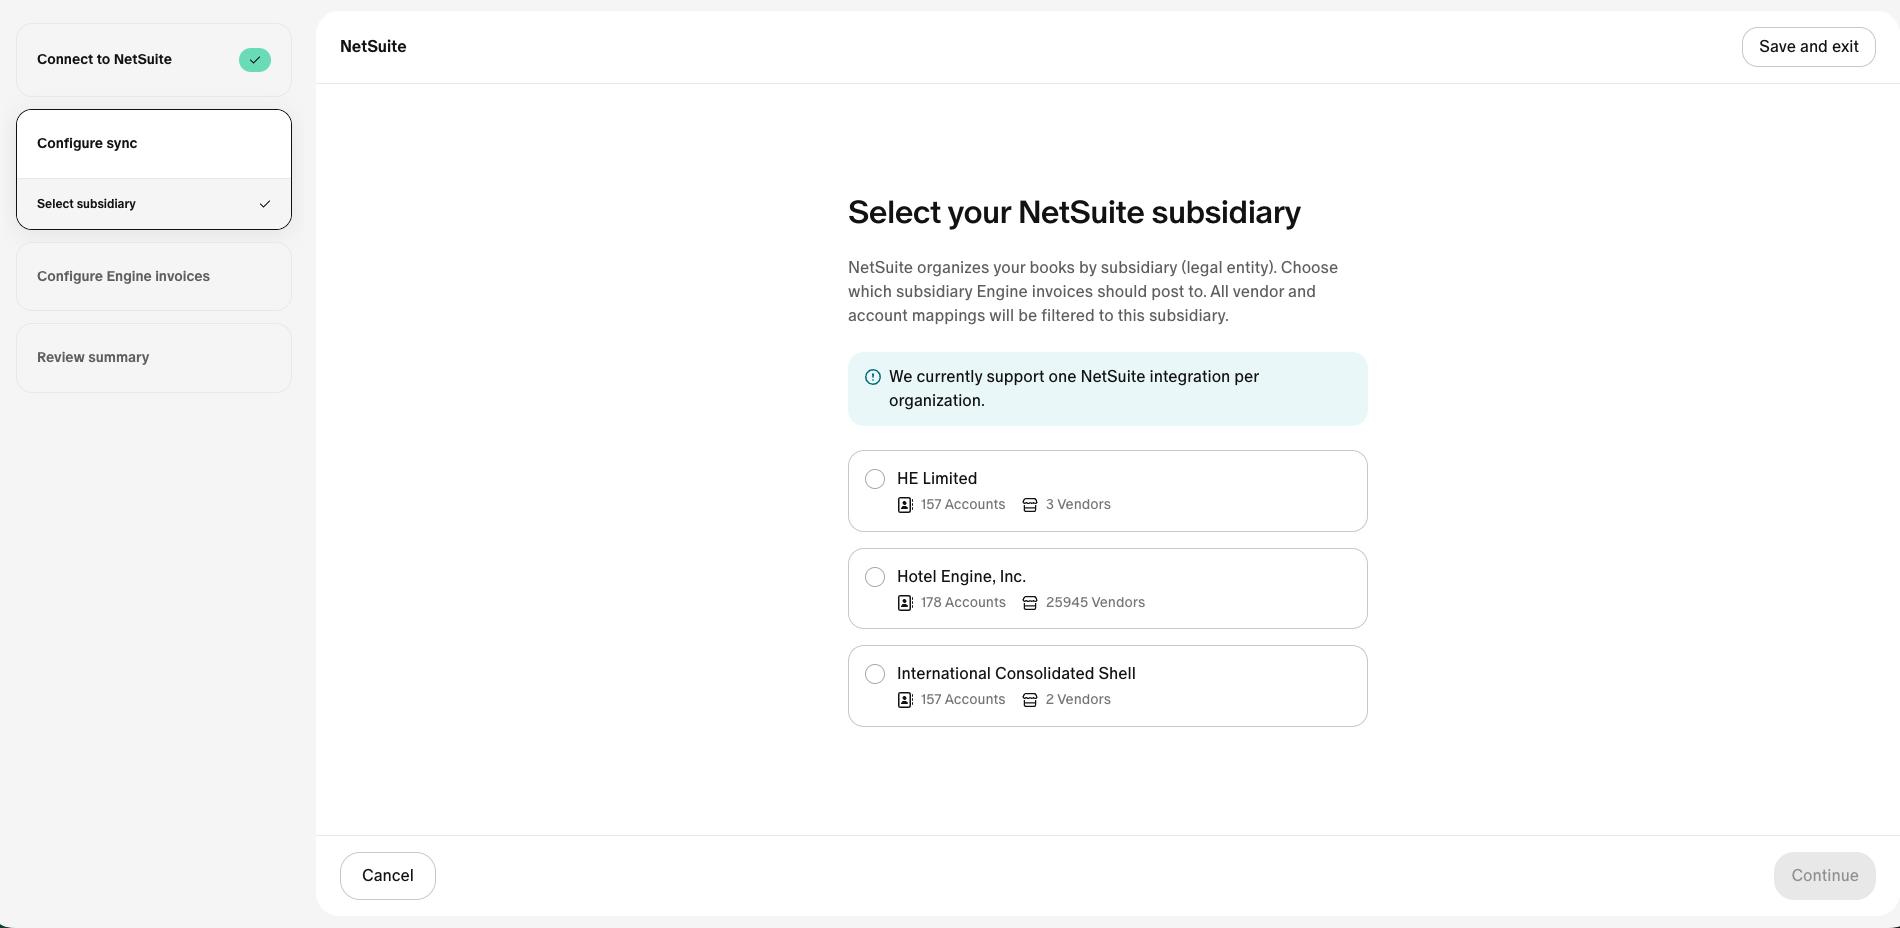
- Currently, Engine supports integration with a single NetSuite entity. If you have multiple entities in NetSuite, they will all be displayed on this screen.
- Select the entity you want Engine to sync with for billing purposes. This will drive which fields are available for invoice mapping in the subsequent steps.
- Click Continue.
11. Configure how Engine invoice types map to NetSuite
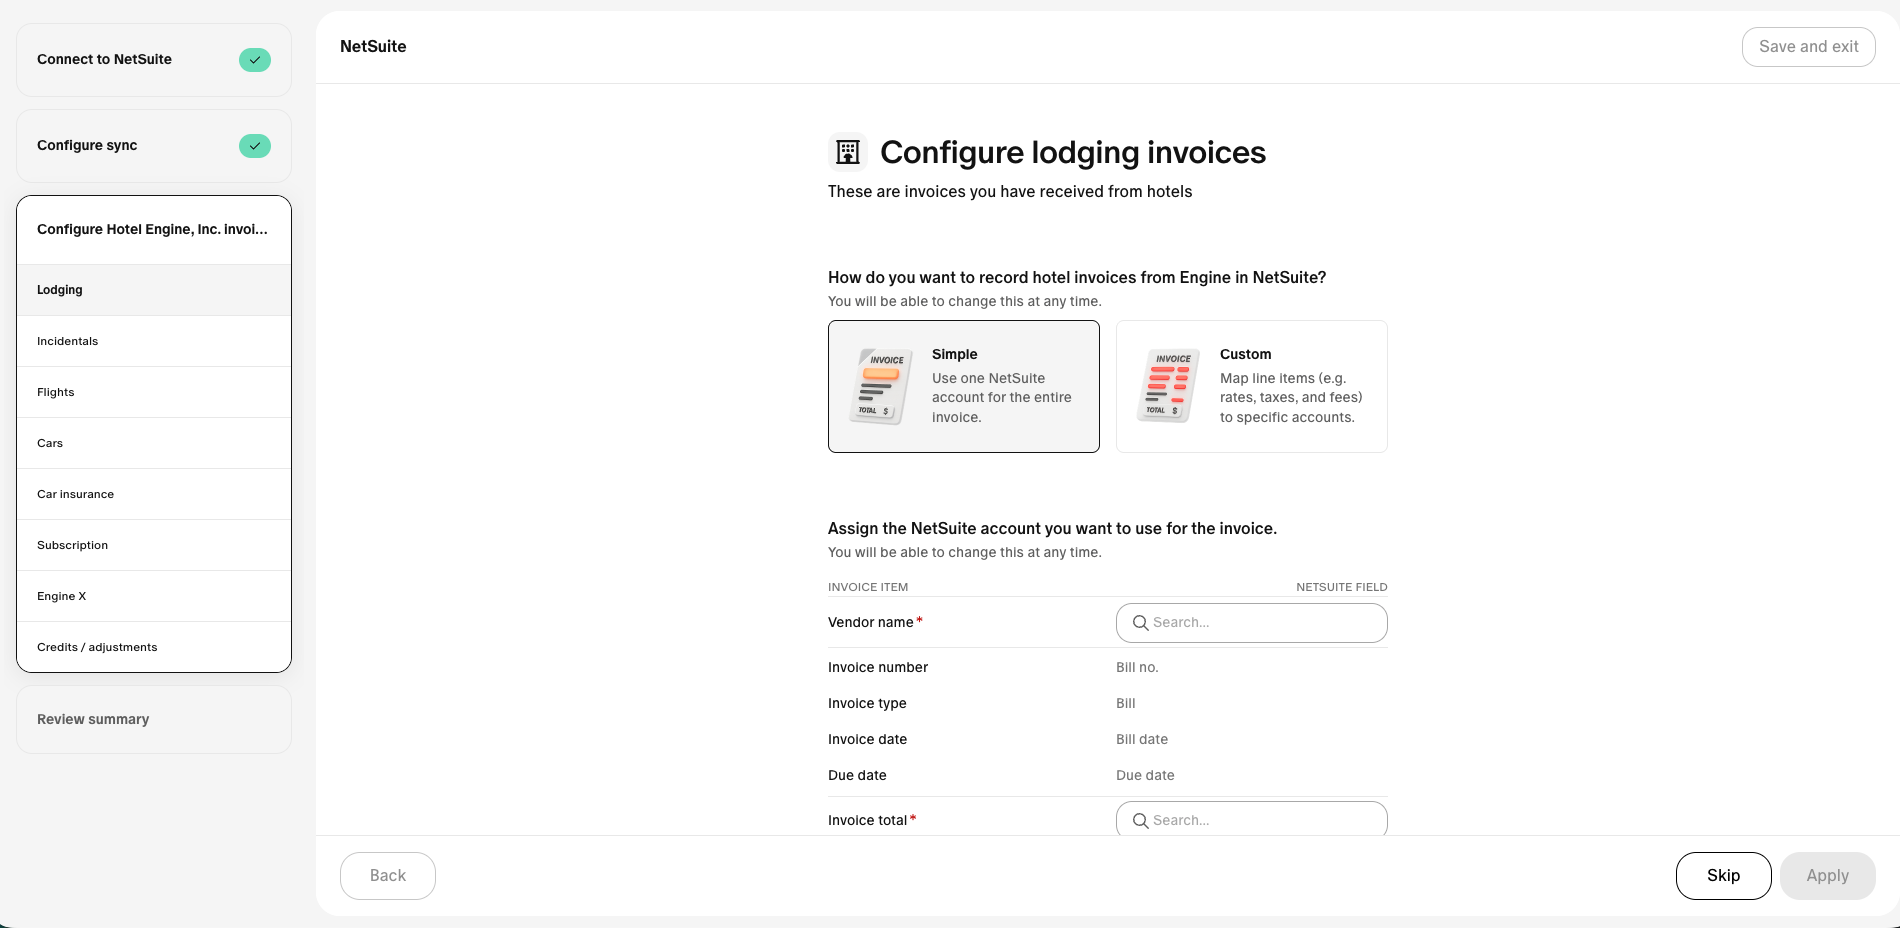
- You'll now configure how different Engine invoice types should appear in NetSuite.
- Most invoice types can be set up with either:
- Simple mapping, or
- Custom mapping
- Custom mapping lets you map individual line items to specific NetSuite expense accounts.
- Many customers use Simple unless they need more detailed accounting rules.
12. Set up lodging invoice mapping
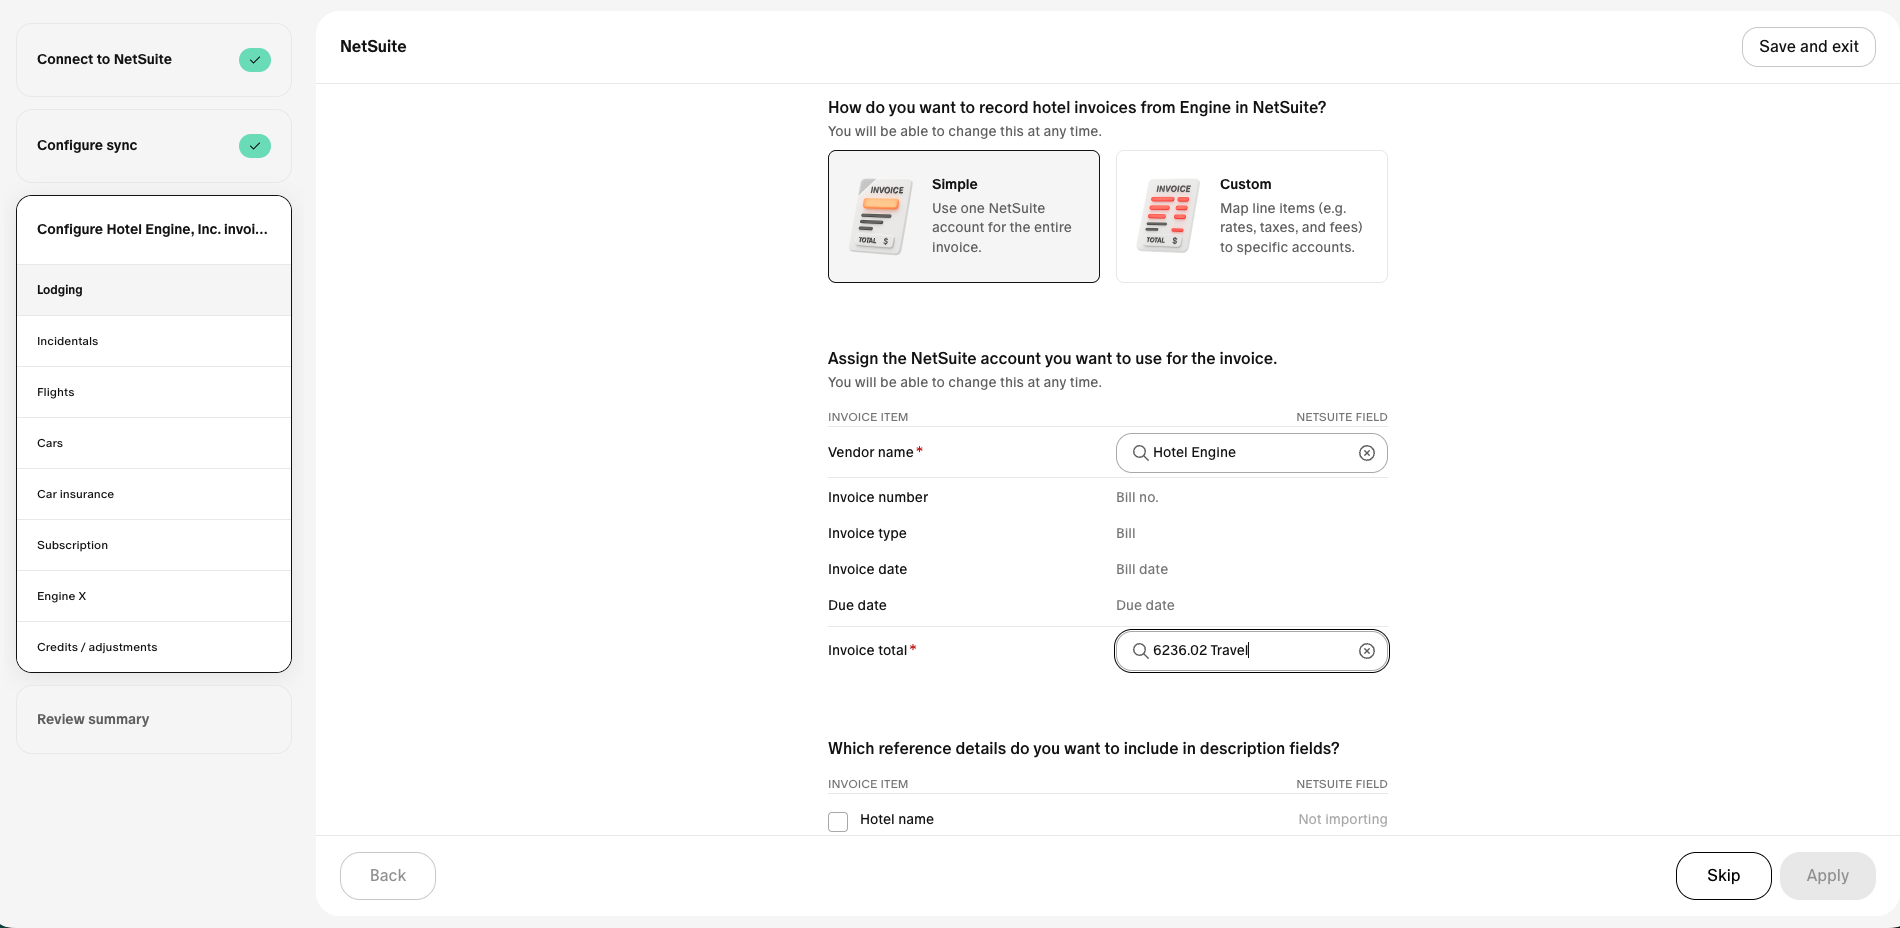
- Start with the Lodging invoice type.
- Choose the NetSuite vendor that should appear on the bill.
- Map the invoice total to the correct expense account (screenshot is using a Simple mapping).
- Map Engine fields to NetSuite fields as needed, for example:
- Hotel Name → invoice memo
- Traveler Name → a custom NetSuite field
- Map any Engine custom fields to NetSuite targets such as:
- Department
- Class
- Project-related fields
- Be careful not to map multiple fields to the same non-free-text NetSuite target by accident. This will cause sync errors when sending bills to NetSuite.
- NetSuite values must match Engine values exactly, or the sync will be rejected. This can, however, be manually fixed down the line at the time of bill syncing.
13. Send a test invoice to verify the connection
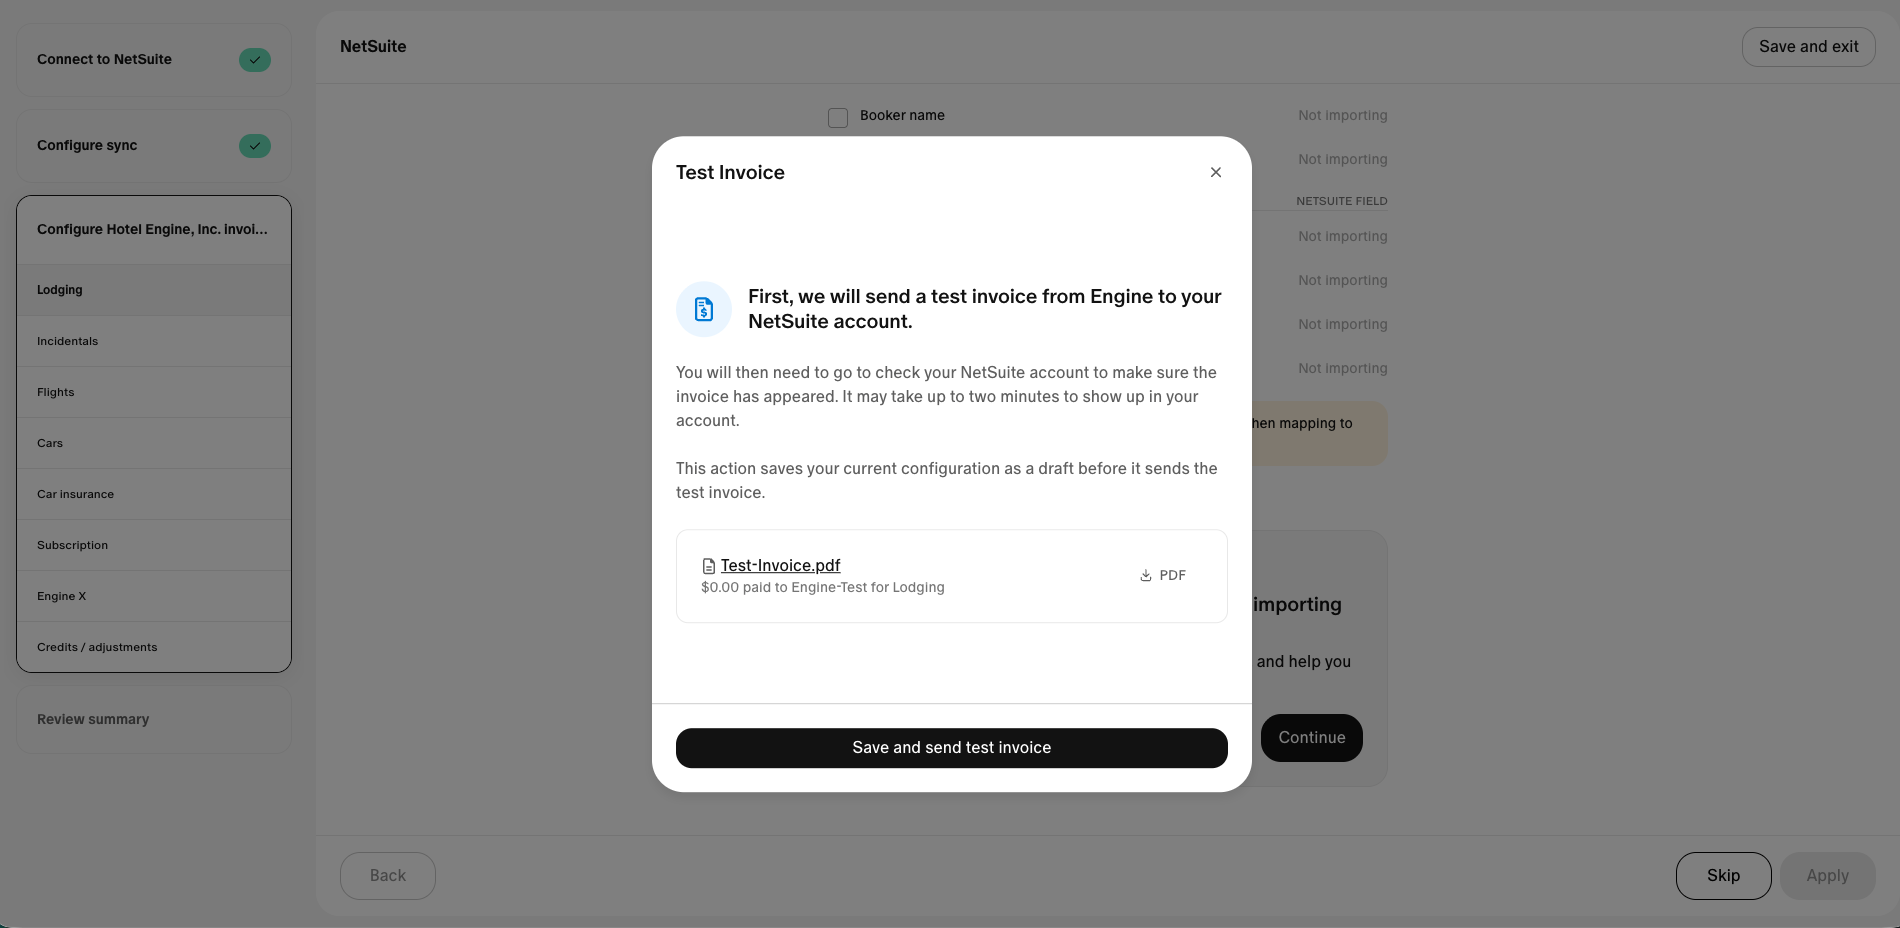
- After configuring lodging, send a test invoice (sent as $0.01 since NetSuite can be configured to reject $0.00 bills).
- In NetSuite, confirm the test bill appears.
- Verify that the mapped fields appear correctly, such as the hotel name in the memo. Note, non-free-text custom fields can not currently be tested with the test invoice. These will need to be confirmed with real data syncing to NetSuite.
- If the invoice looks correct, the integration is working. Confirm everything looks good, and click Apply in the bottom right.
14. Finish setup and activate the integration
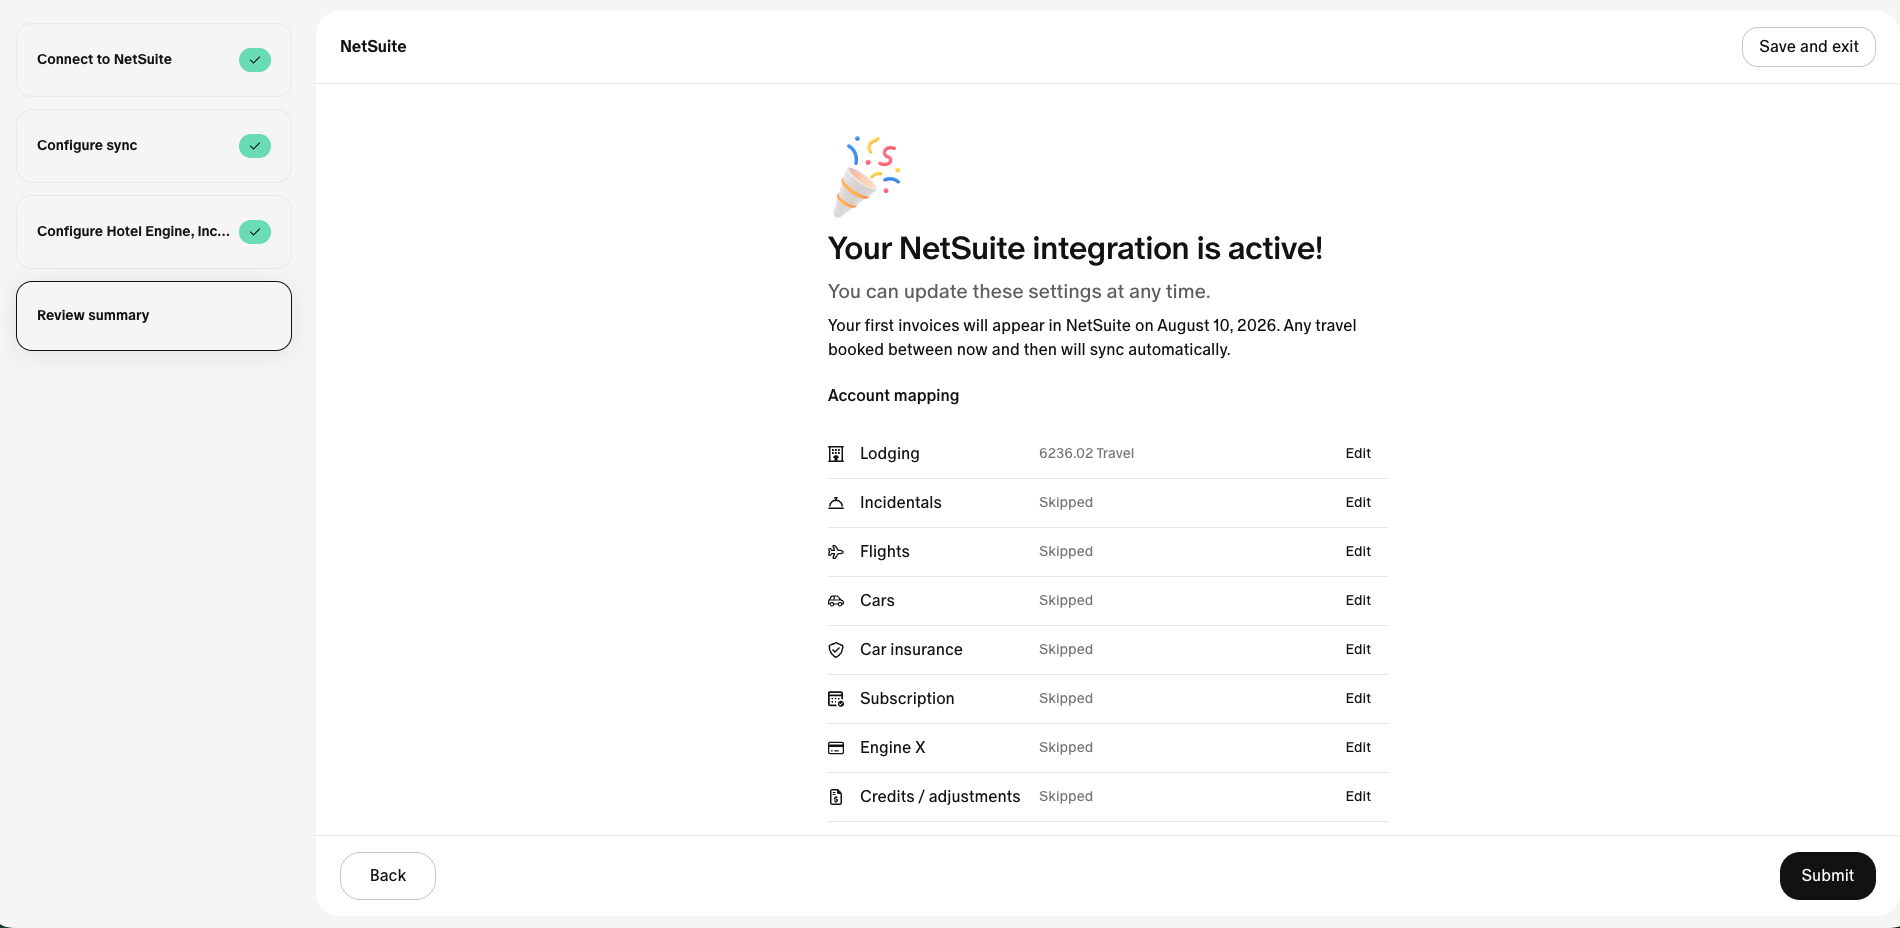
- Configure any additional invoice types if needed.
- Once all required steps are complete, click Submit.
15. Confirm integration is active
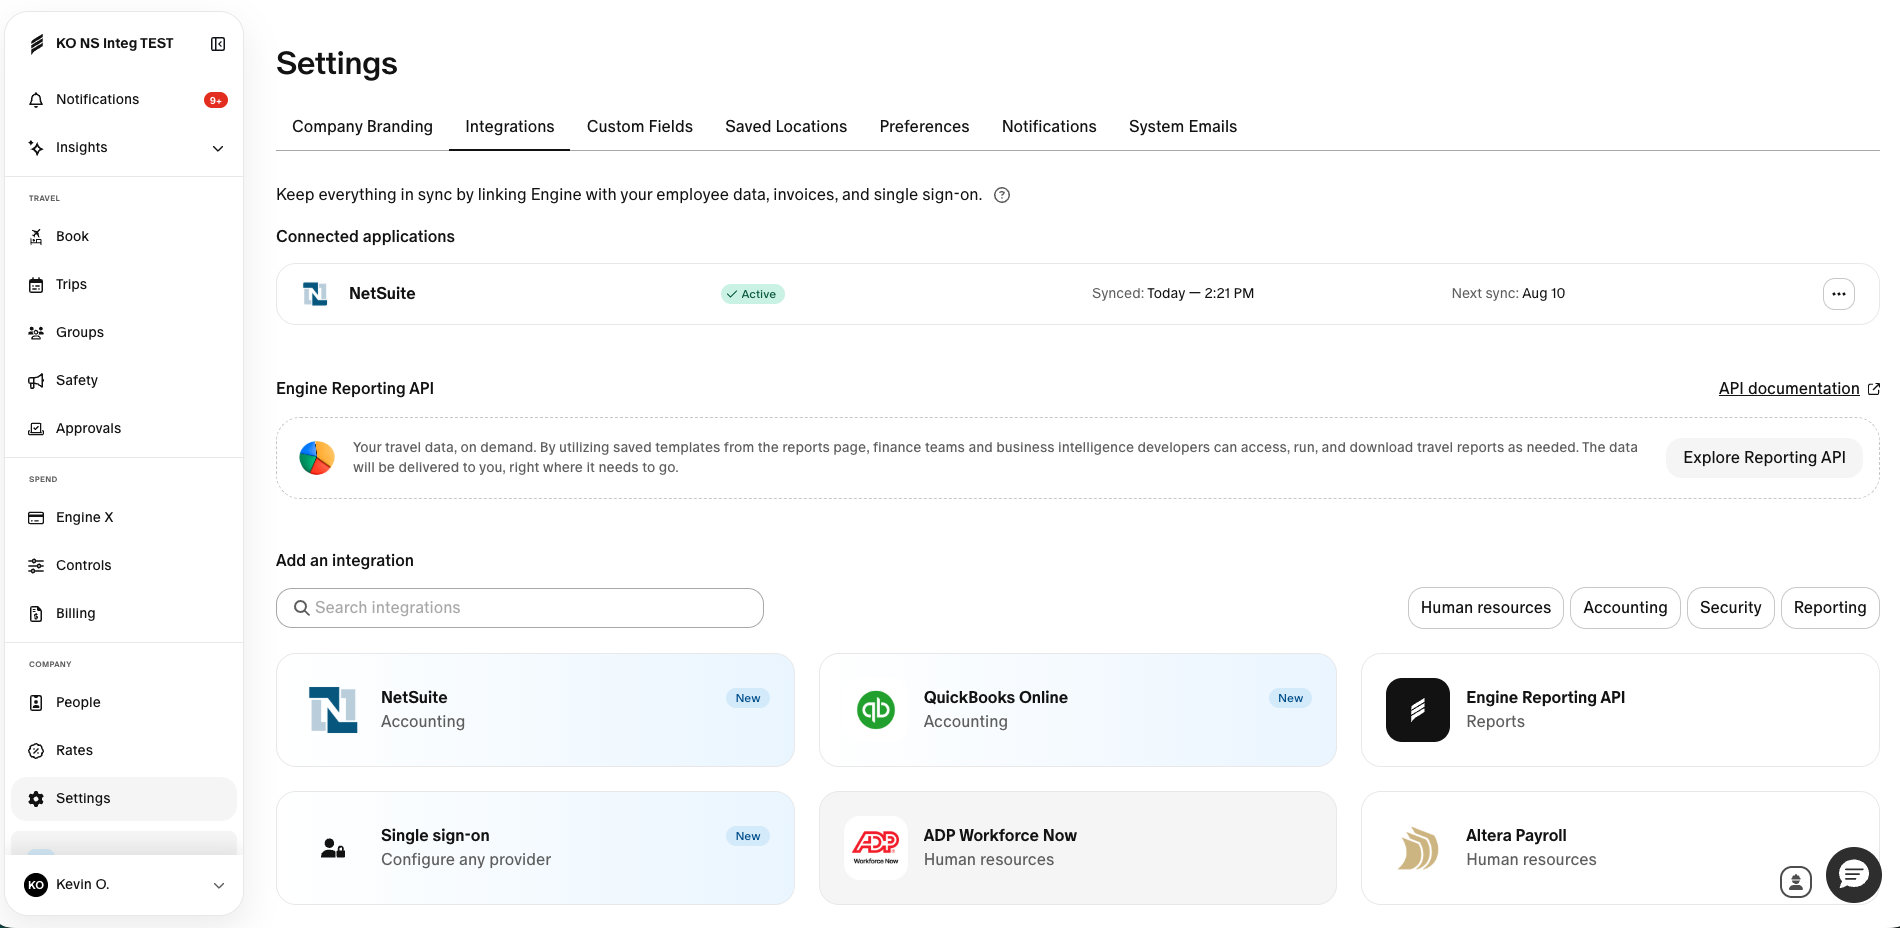
- Once the setup wizard closes, Engine will show the NetSuite integration as active on your integration page.
- From this point forward, Engine will automatically sync bills into NetSuite when statements drop.
16. Post-setup: Billing > NetSuite syncs tab
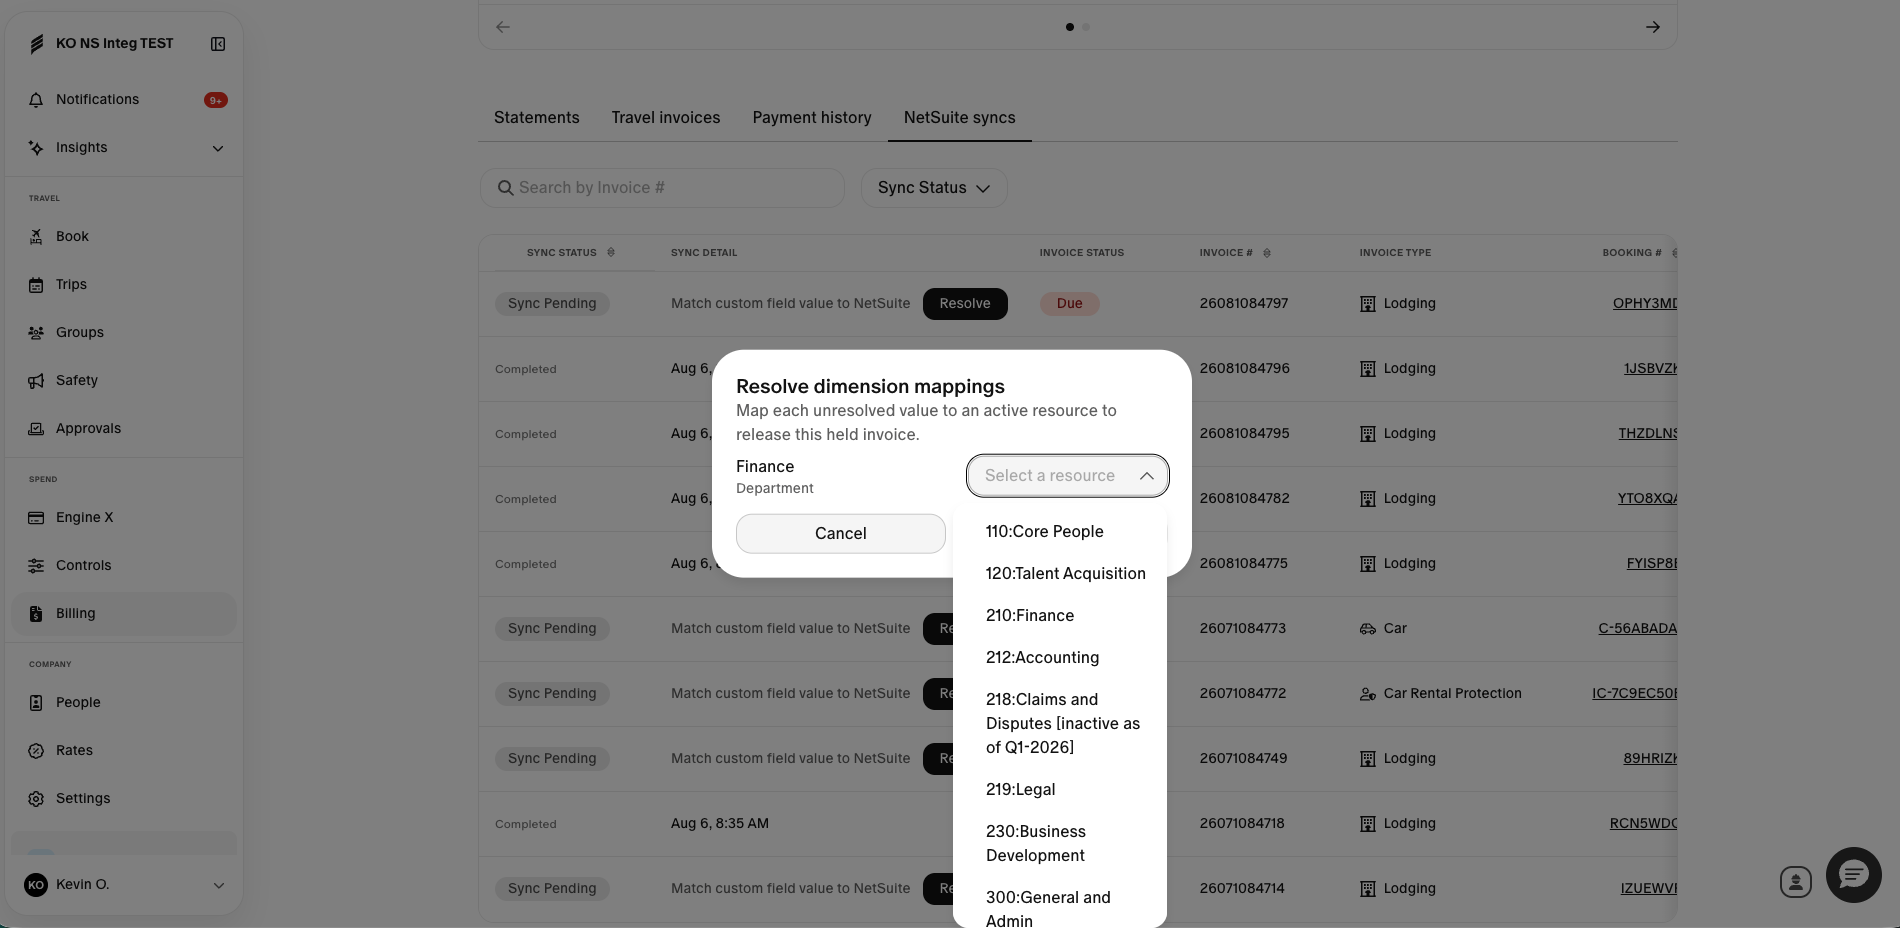
- After the integration is configured and syncing begins, you will see a NetSuite syncs tab on your Billing page.
- On this page, you can view individual bill sync statuses and review or resolve any sync errors.
- Mapping error resolution screens are used to set up persistent rules for matching Engine customer field values with NetSuite target field valid values.