Sage Intacct integration
How to set up and configure the Sage Intacct integration in Engine.
← Back to Accounting integrations
1. Confirm prerequisites before starting
- This setup connects Sage Intacct to Engine so your Engine invoices post automatically into Sage Intacct as AP bills.
- You must be an Engine admin to access Settings > Integrations, and you need top-level admin access in Sage Intacct.
- The Sage Intacct integration is available for Direct Billing and Engine X customers.
- Check whether your Sage Intacct company uses role-based or user-based permissions under Company > Setup > Company > General Information > Global settings. This decides whether you create a role in step 5.
- Plan on about 30 minutes for the one-time setup.
2. Start the Sage Intacct integration in Engine
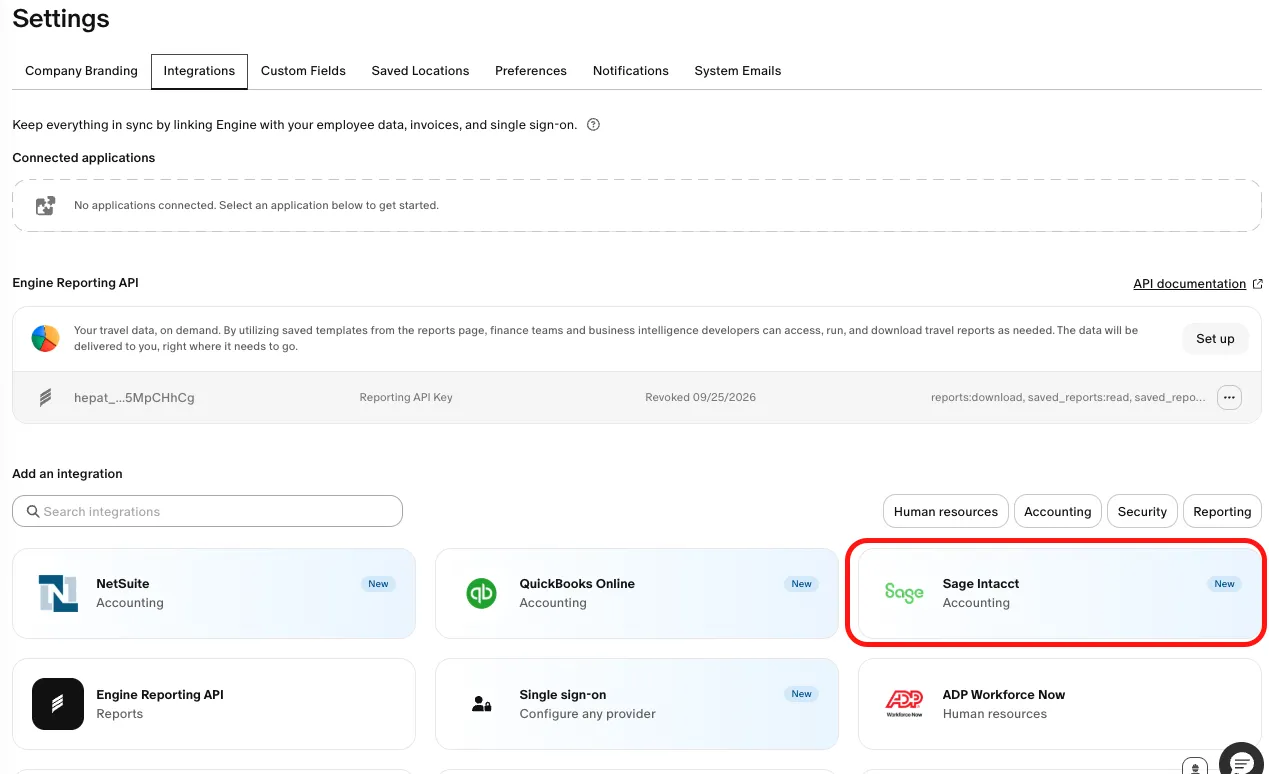
- In Engine, go to Settings > Integrations.
- Select the Sage Intacct tile.
- Review the setup overview, acknowledge the third-party services notice, and continue.
-
This launches the guided setup flow, which includes:
- Sage-side configuration
- Entity selection
- Invoice mapping
- Review and activation
3. Complete the Sage-side setup checklist
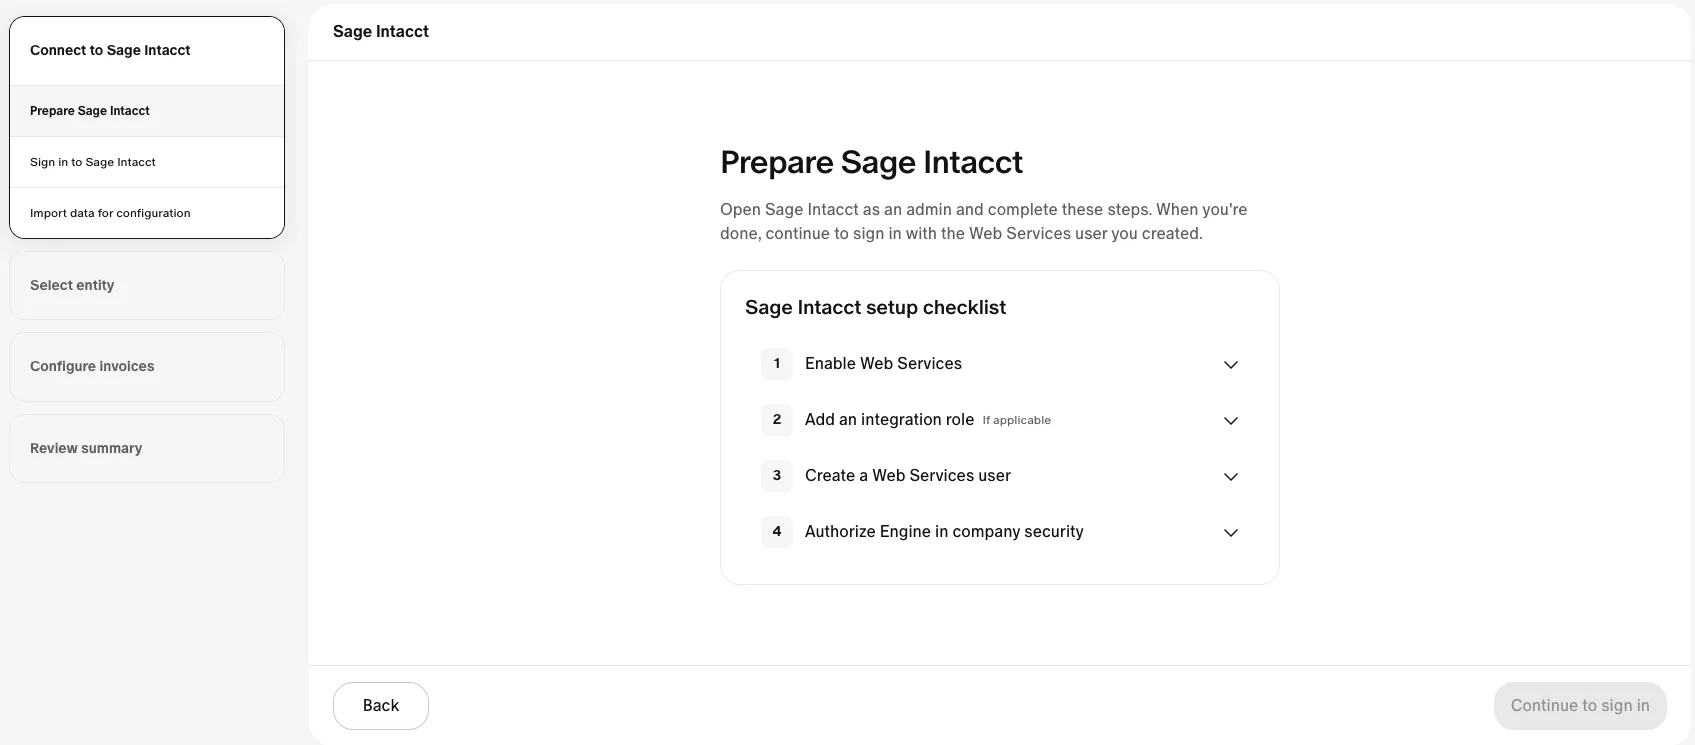
- Engine presents a checklist of Sage-specific setup tasks.
-
These tasks must be completed in Sage Intacct before the integration can be activated:
- Enabling web services
- Creating an integration role (if your account uses role-based permissions)
- Creating a web services user and assigning the role or permissions
- Authorizing Engine in Sage Intacct security settings
- The exact click path is shown in Engine for each task. Steps 4 through 7 below walk through the same tasks.
4. Enable web services in Sage Intacct

- In Sage Intacct, go to Company > Admin > Subscriptions.
- Find Web Services and make sure it is turned on.
- If it is already enabled, mark this step complete in Engine.
5. Create the integration role and assign required permissions
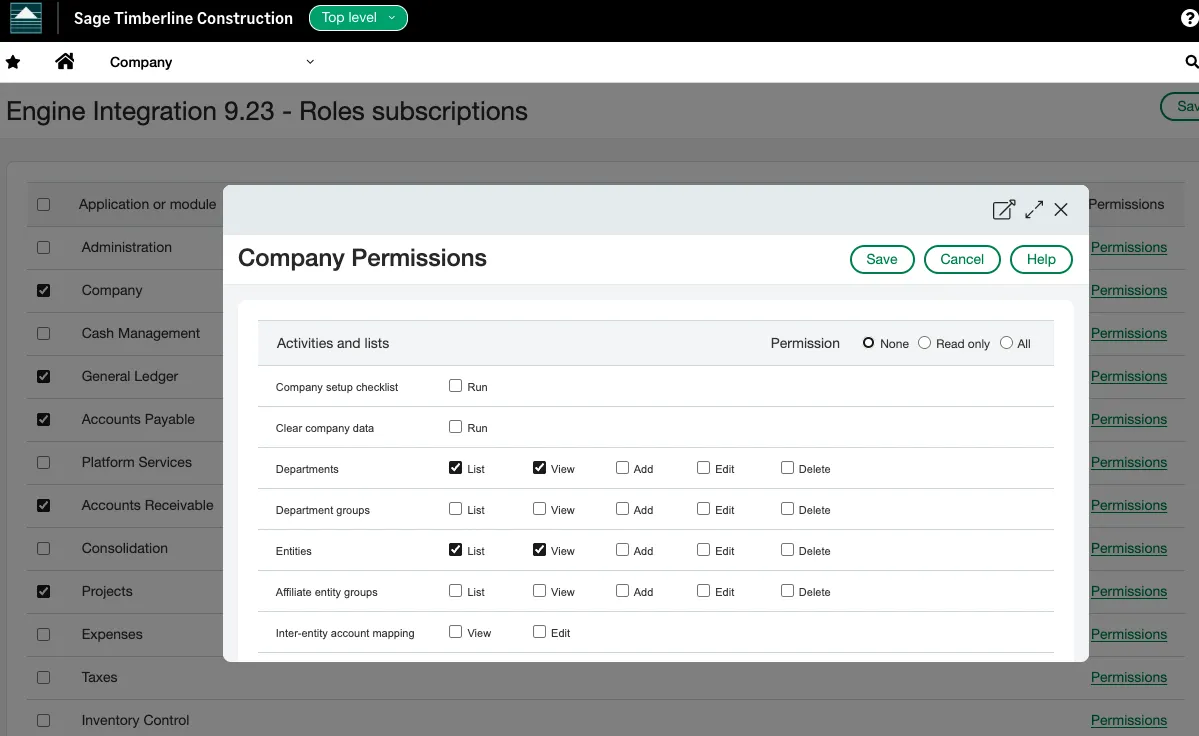
- This step applies to accounts that use role-based permissions. If your Sage Intacct account uses user-based permissions, skip this step and assign the permissions directly to the web services user in step 6.
- In Sage Intacct, go to Company > Admin > Roles.
- Create a new role, such as Engine Integration.
-
Add the permissions Engine needs to sync bills correctly:
- General Ledger: Accounts (List, View)
- Accounts Payable: Vendors (List, View); Bills (List, View, Add); Adjustments (List, View, Add)
- Company: Entities, Locations, Departments, and Classes (List, View); Attachment Folders (List, View, Add); Attachments (List, View, Edit)
-
Add optional permissions depending on what you want to map on bills:
- Accounts Receivable: Customers (List, View)
- Projects: Projects and Tasks (List, View)
- Construction: per your setup, only if you subscribe to Construction
- Save the role.
6. Create a web services user and assign the role
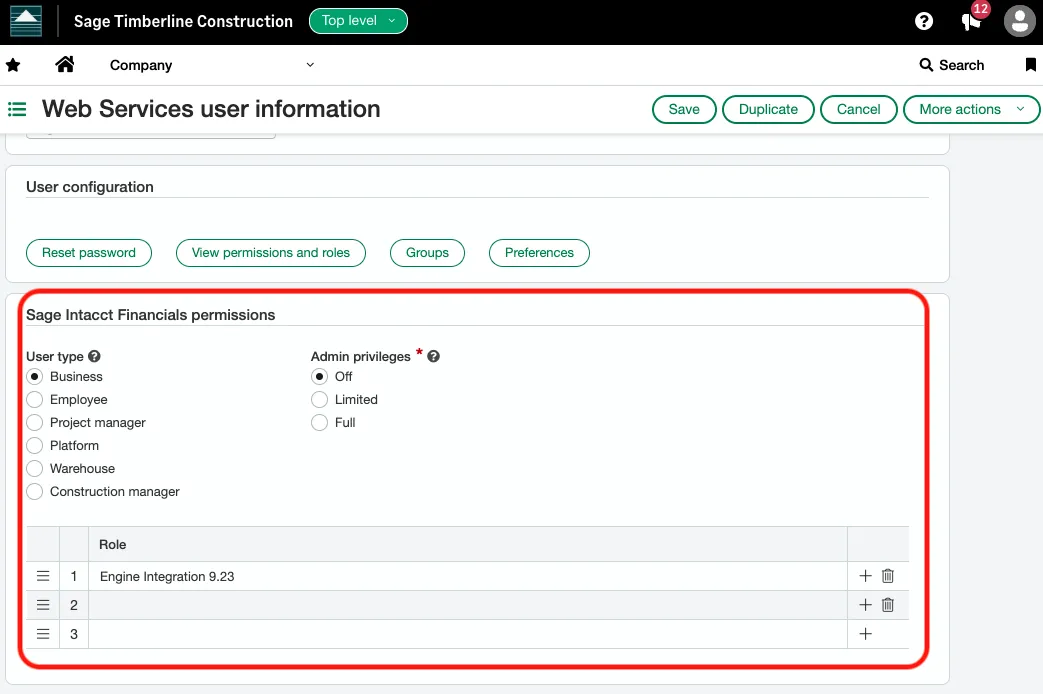
- In Sage Intacct, go to Company > Admin > Web Services Users.
- Create a new web services user. This user is for programmatic access and cannot log into Sage Intacct like a normal user.
- Assign the role created in step 5 to this user. If your account uses user-based permissions, assign the required permissions directly to this user instead.
- Save the web services user ID. Engine needs it to connect in step 8, and user IDs are case-sensitive.
7. Authorize Engine in Sage Intacct security settings
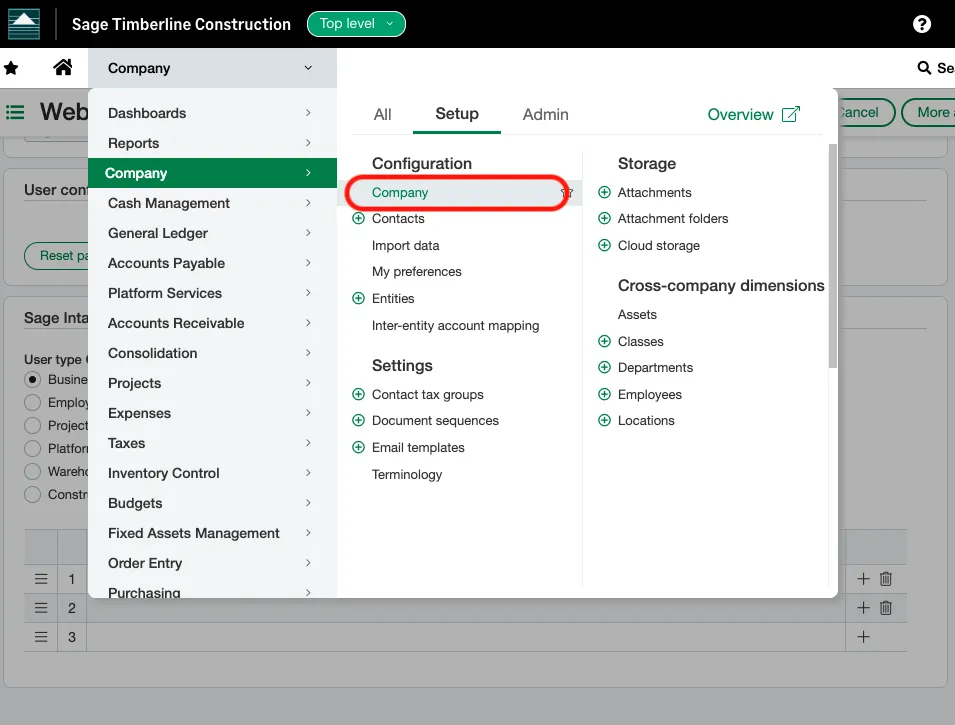
- In Sage Intacct, go to Company > Setup > Company and open the Security tab.
- Under web services authorizations, add Engine's web services sender ID. Engine shows this value in the setup instructions.
- Under authorized client applications, add Engine's client ID, also shown in the Engine setup instructions.
- Enter the web services user ID you created in step 6.
- Save the company security settings, then mark this step complete in Engine.
8. Connect Engine to Sage Intacct
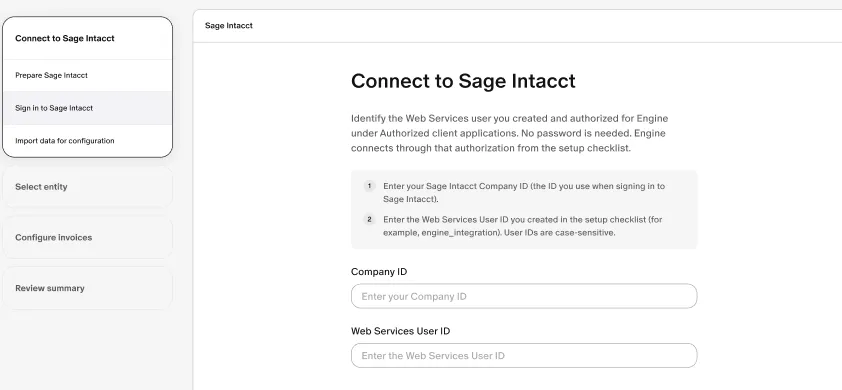
- Back in Engine, continue the setup flow.
- Enter your Sage Intacct Company ID, the ID you use when signing in to Sage Intacct.
- Enter the web services user ID from step 6. No password is needed. Engine connects through the authorization you added in step 7.
- Click Connect.
-
Engine pulls in the Sage Intacct data needed for mapping:
- Vendors
- Chart of accounts
- Custom fields
- Projects
- Customers and other lists the integration has permission to read
9. Choose the Sage Intacct entity to sync to
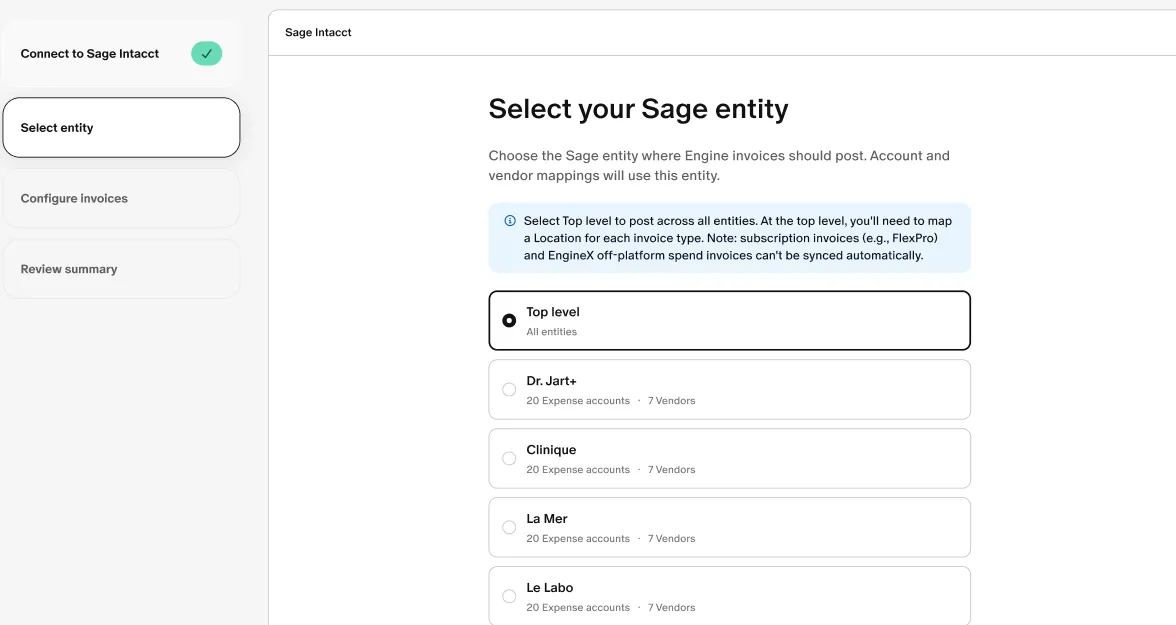
- Select the Sage Intacct entity where Engine bills should post. You can choose a single entity or the top-level entity.
- If you select a single entity, all mappings are scoped to that entity, and the mapping options in the next step reflect it.
- If you select top level, Engine can route bills to different entities using a custom field mapped to Location. You will map a Location for each invoice type.
- Note: subscription invoices (such as FlexPro) and Engine X off-platform spend invoices cannot sync automatically at the top level.
- Click Continue.
10. Map Engine fields to Sage Intacct and resolve required-field warnings
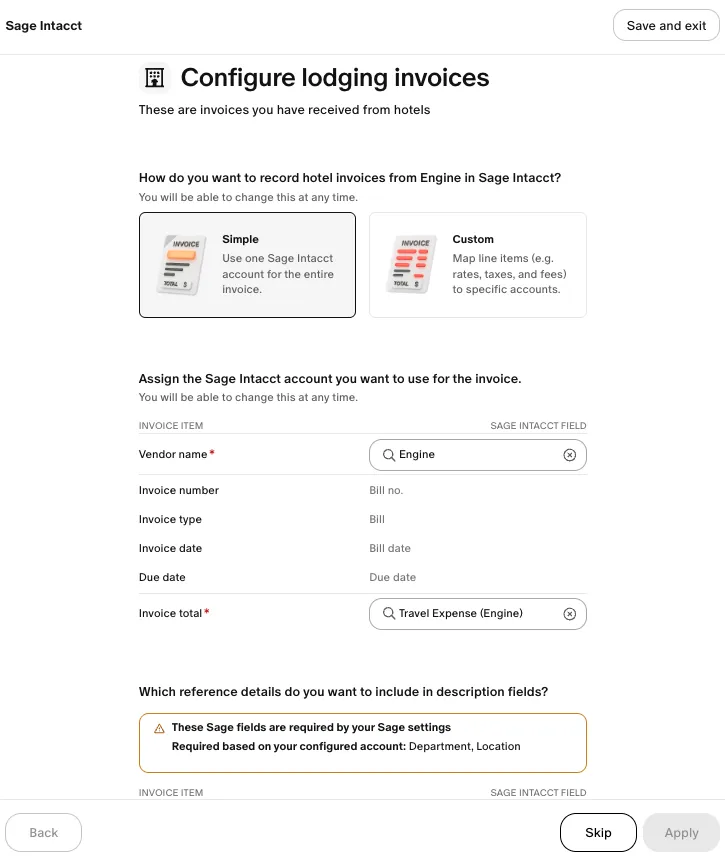
- Start with the Lodging invoice type. Choose Simple mapping to use one Sage Intacct account for the entire invoice, or Custom mapping to map line items such as rates, taxes, and fees to specific accounts.
- Select the vendor that should appear on bills from Engine. This should be Engine, or whatever name you use for Engine in Sage Intacct.
- Select the expense account you want reflected on bills from Engine.
-
Map Engine data to Sage Intacct targets. Synced bills include the coding tagged to each
trip booked through Engine, including dimensions such as:
- Location
- Department
- Project
- Sage Intacct may require different fields depending on the selected entity or transaction type. Engine reads those requirements and shows a warning when a required field is missing.
- You cannot continue until every required field is mapped. Once the missing field is mapped, the warning clears.
11. Send a test invoice and verify it in Sage Intacct
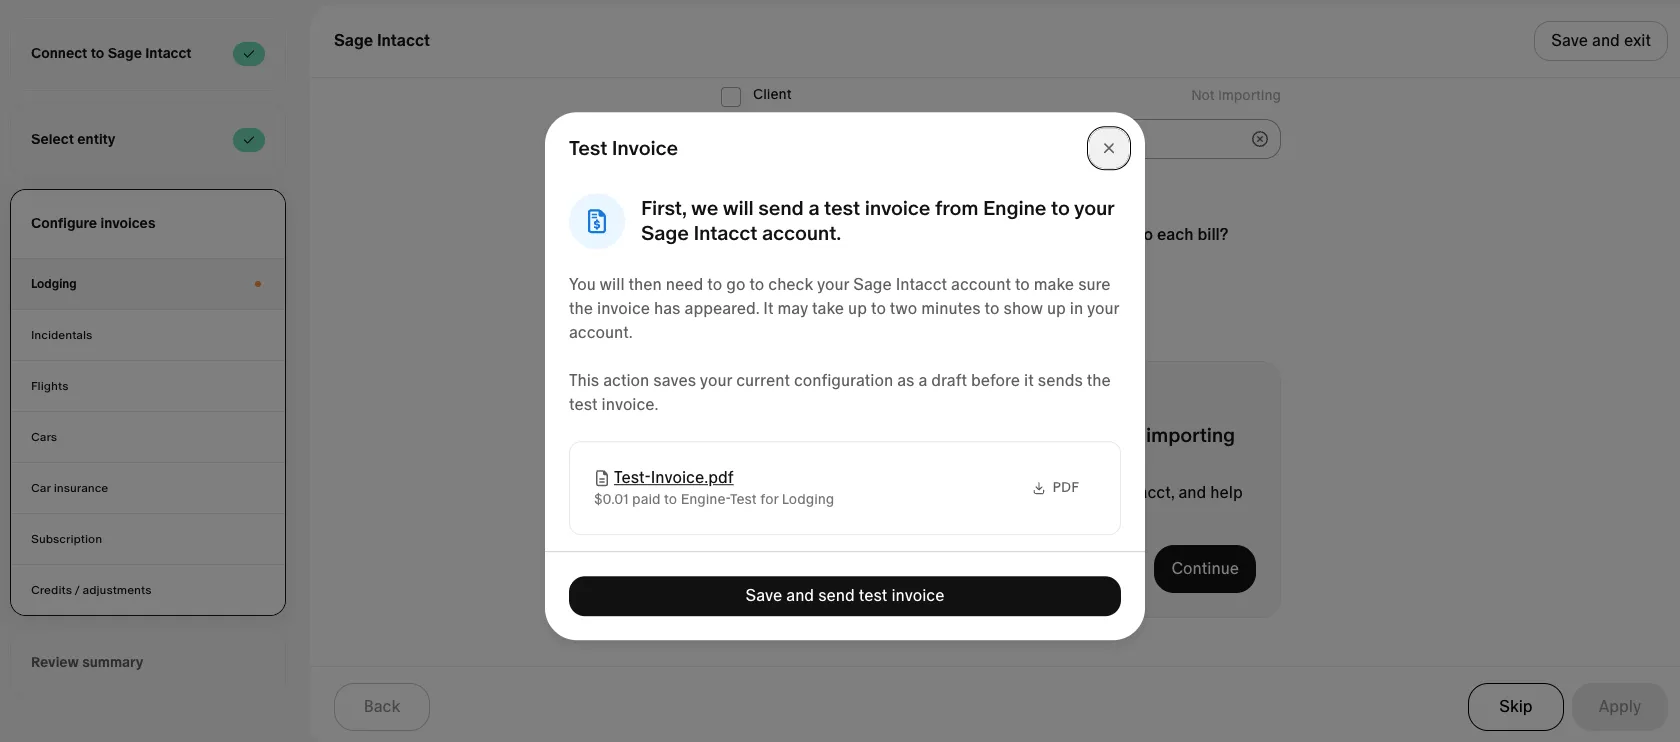
- Run a test invoice from Engine. This saves your configuration as a draft and sends a $0.01 bill to your Sage Intacct account. It should appear in less than 1 minute.
- In Sage Intacct, open the selected entity (or top level) and go to Accounts Payable > Bills to confirm the bill arrived.
-
Verify key details:
- Vendor
- Expense account
- Location. If you are mapping at the top level, Engine uses a representative Location value that exists in your Sage Intacct account for the test.
- If everything looks correct, approve the test and click Apply to save the invoice type.
12. Complete remaining invoice mappings and activate the integration
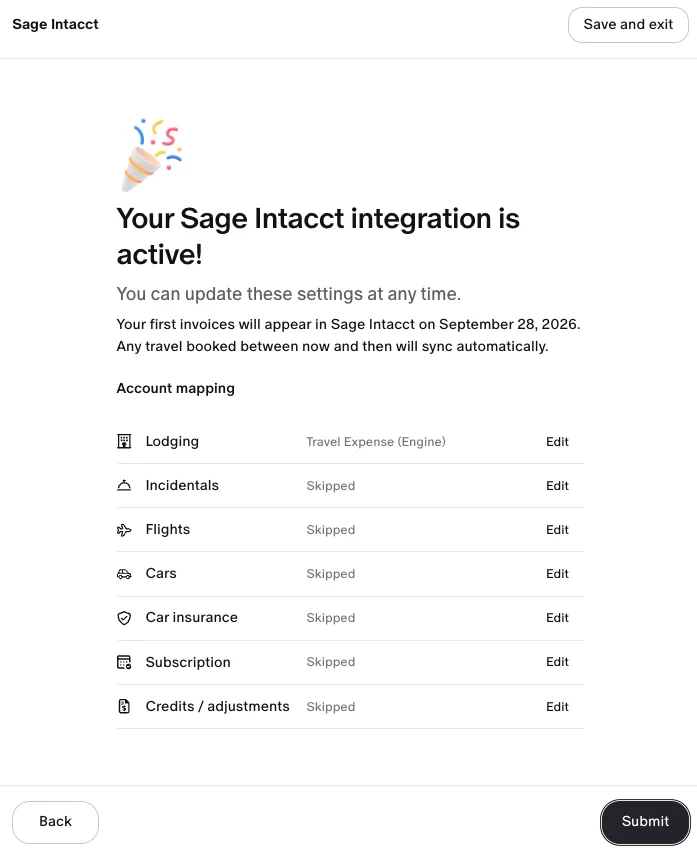
-
Engine supports separate mappings for each invoice type, so repeat step 10 for every
invoice type you use:
- Lodging
- Incidentals
- Flights
- Cars
- Car insurance
- Subscription
- Credits / adjustments
- Select Skip for any invoice type you do not use or do not want to sync automatically.
- Once all invoice types are mapped or skipped, review the summary page.
- Click Submit to activate the integration.
- Once active, Engine automatically syncs bills and trips from future statement drops into Sage Intacct. You can update these settings at any time.